Foodnerd SIDE DRAWER Features
There are different options available as shown below:
Location
Purpose
Under location, you can oversee and operate different restaurants with one central system, i.e., Foodnerd table POS system.
How to use it?
It appears first on the sidebar of Foodnerd POS.
To properly use this feature, the user has to follow few steps:
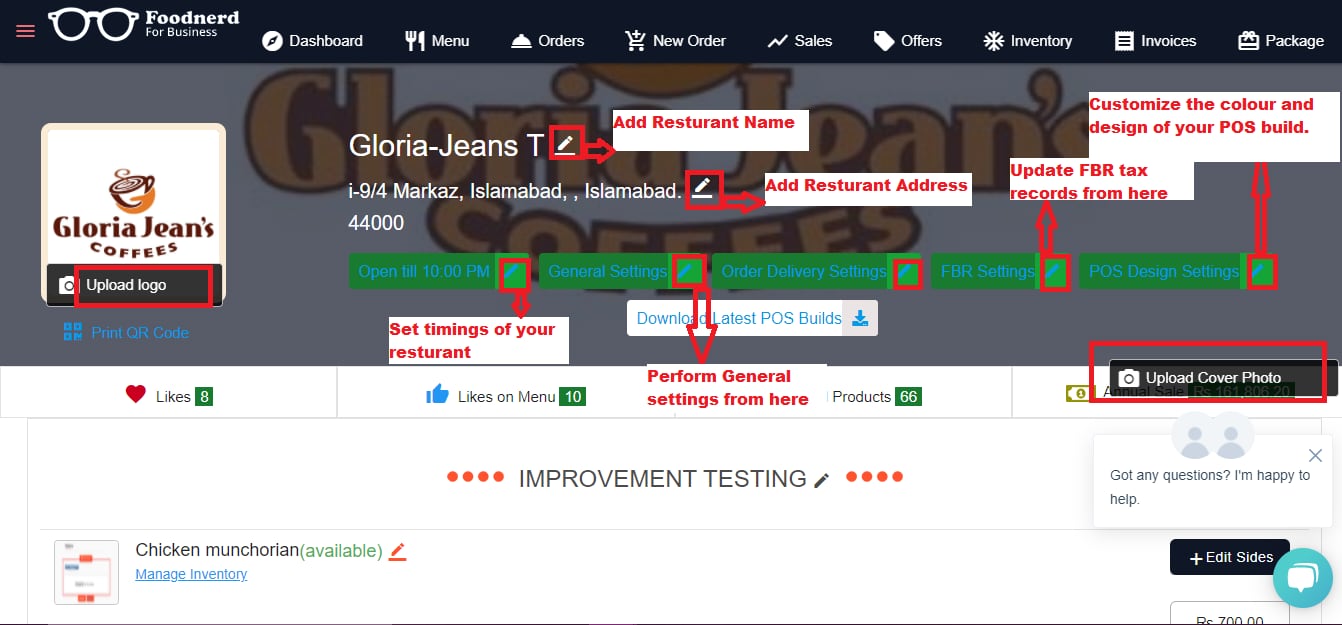
- Click → the ‘Location’ Tab, and you will be redirected to get its proper access.
- Click → edit icon vector to add → Restaurant Name and Restaurant Location.
- Add or Update → Store Logo and Cover Photo.
After adding restaurant name and location:
- Set restaurant → Timings (opening and closing hours)
- Perform→ General Settings
- Update → FBR settings
- Customize → POS Design Settings.
- Thoroughly analyze the below picture to understand where you’ll include different details.
Home
Purpose
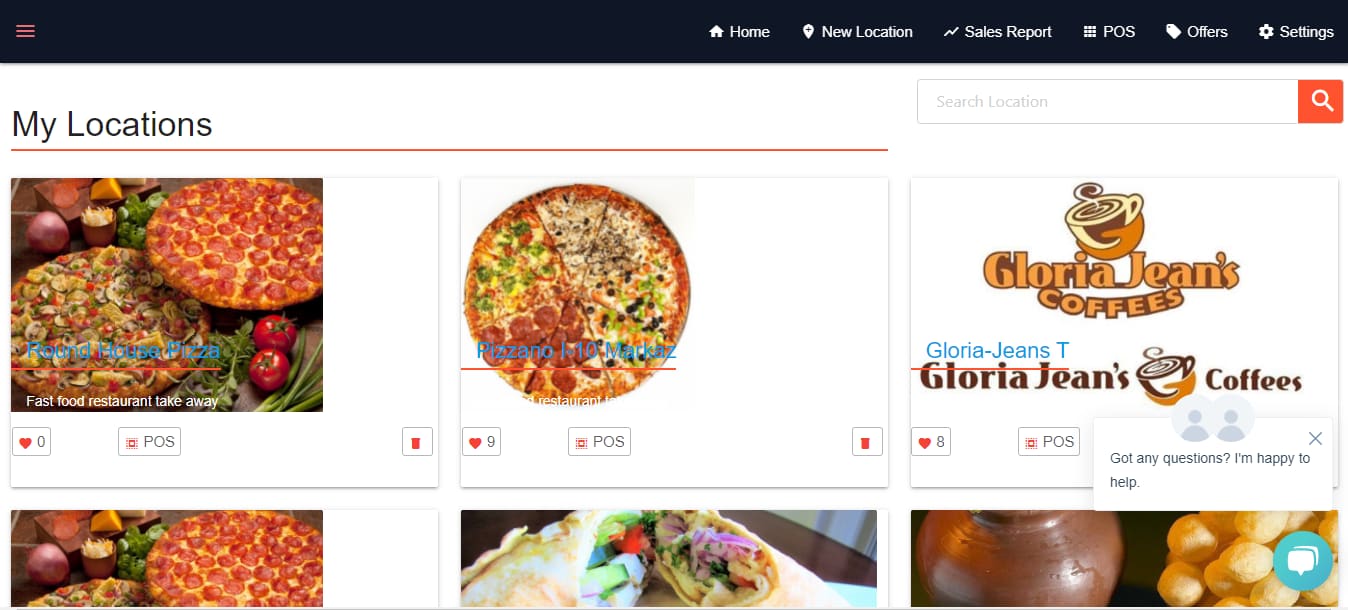
The home tab provides you a quick snapshot of your restaurants operating in different locations. Most of the frequently used commands are also located in the home tab.
How to use it?
To visit the Home tab, Hover your mouse over the “Home” tab located under the Location tab inside the drawer. Click on it, and you’ll be redirected to it.
To properly use this feature, the user has to follow few steps:
Dashboard
Purpose
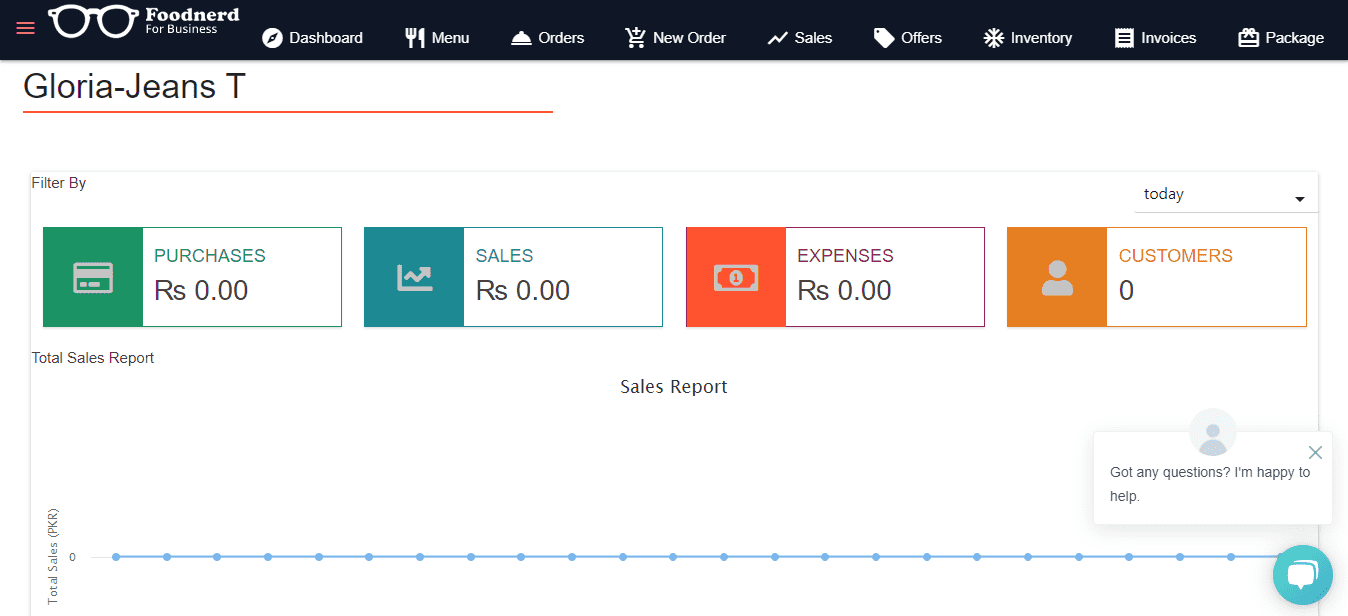
The third feature is a dashboard that allows you to quickly navigate all the relevant information, such as purchases, sales, Expenses, and customer information, of your restaurant that needs immediate attention.
How to use it?
To get to Dashboard, Hover your mouse to → Dashboard Button and click on it. The dashboard overview page will appear as shown below:
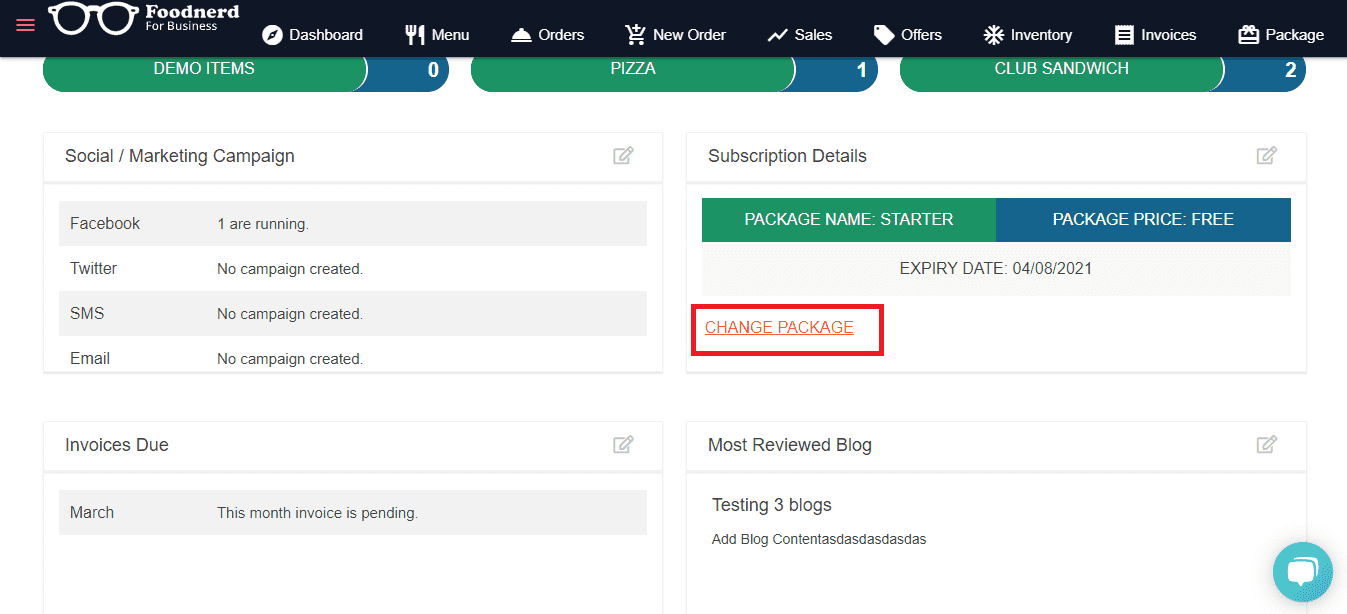
- Inside the dashboard, there is also an option of ‘Change Package.’ From there, you can easily upgrade/downgrade your current package.
- To upgrade or downgrade your package, Click→ Change Package; pricing packages will appear. Choose accordingly.
POS
Purpose
Point of Sale is a platform to manage your business effectively and efficiently in one place. Foodnerd POS system feature allows users to perform several actions. Users can also view the coming order number along with details.
How to use it?
- To Reply to an order Click→ Reply Button and send the order complete duration information.
- To reject any order, tap→ the Reject option located on the right of the reply button and then press confirm.
- To generate receipt click→ receipt, different options will appear, such as a print receipt, single print, delta print and break print. Choose the option according to the requirements.
- Thoroughly analyze the below image to understand the functionality regarding your incoming and in-progress orders.
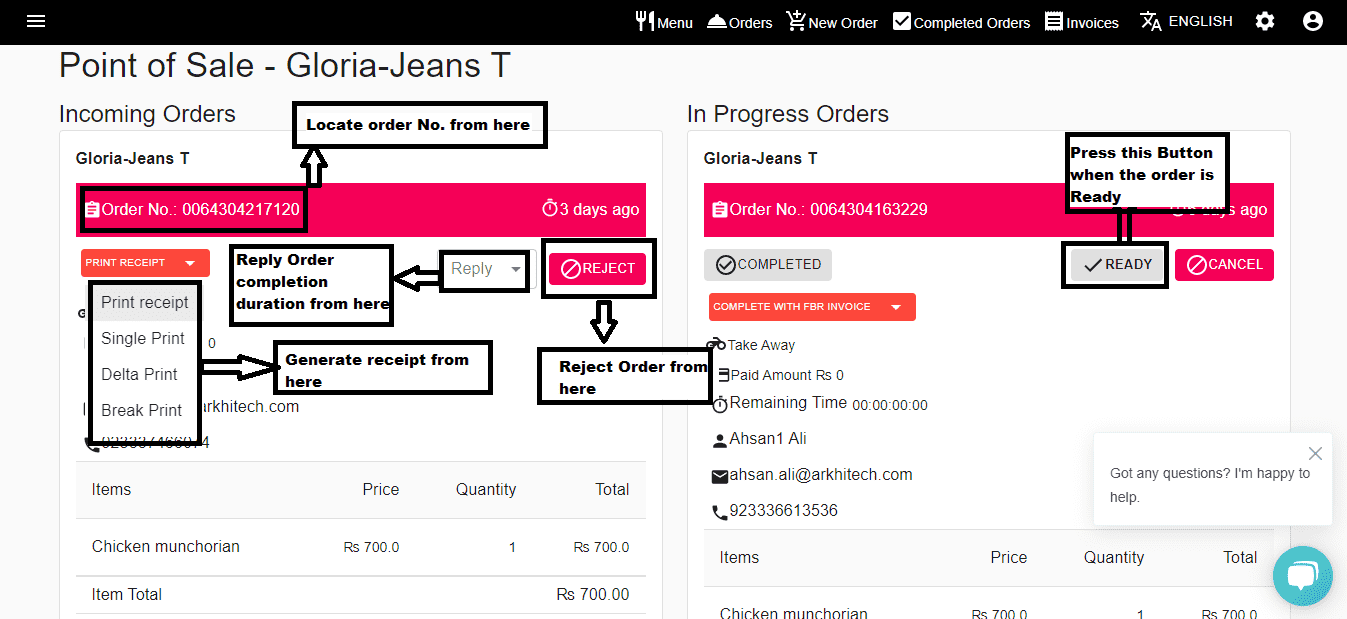
- You can also view completed and in-progress orders. Hover your mouse on the page’s header where you can locate different options such as Menu, Orders, New Orders, Completed Orders, Invoices language, and settings. Click→ New Order to view any latest order, tap on→ Completed orders to view records of all completed orders.
- You also have different payment options such as Cash and Credit card. To update payment settings, choose the payment method according to your customer choice.

Drawers
Purpose of Cash Drawer
The drawer feature tracks your daily cash sales and manages your money stored at your point of sales. Users can also extract their drawer reports from here.
How to Get Start With a Drawer?
- Enter→ date, year, and month and Tap→ ‘Search’ to get a Drawer report of any specific day.

- The reports will appear like this as mentioned below in the image:
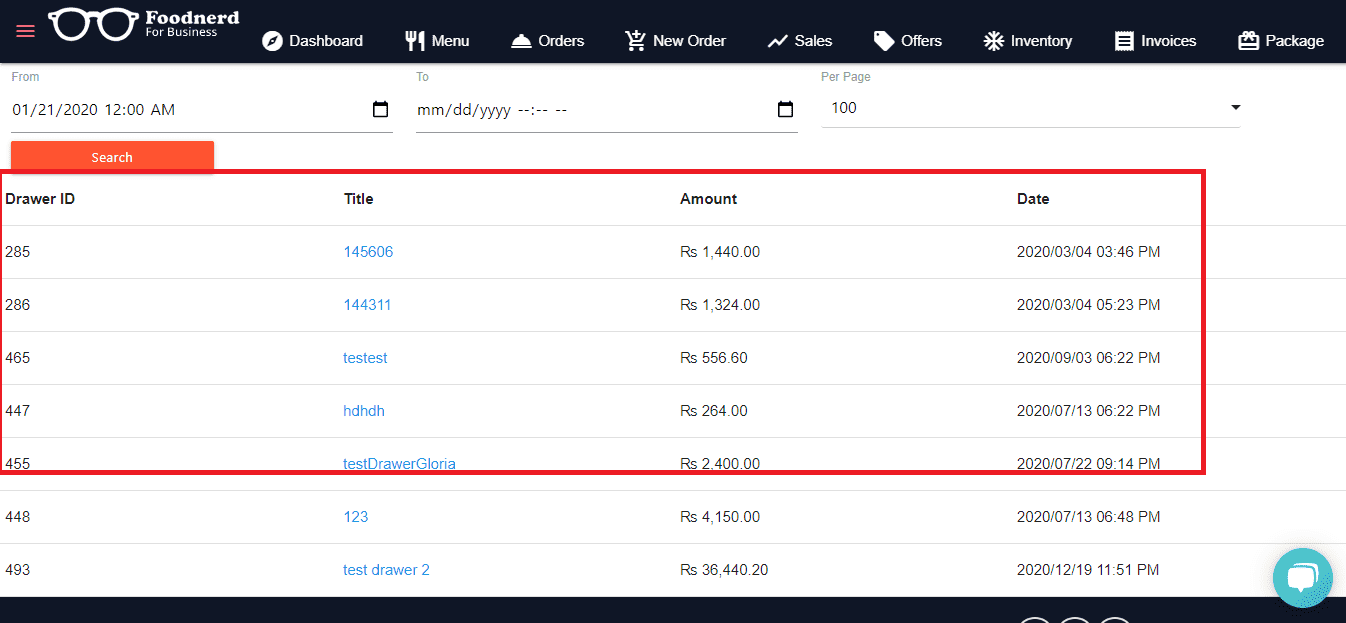
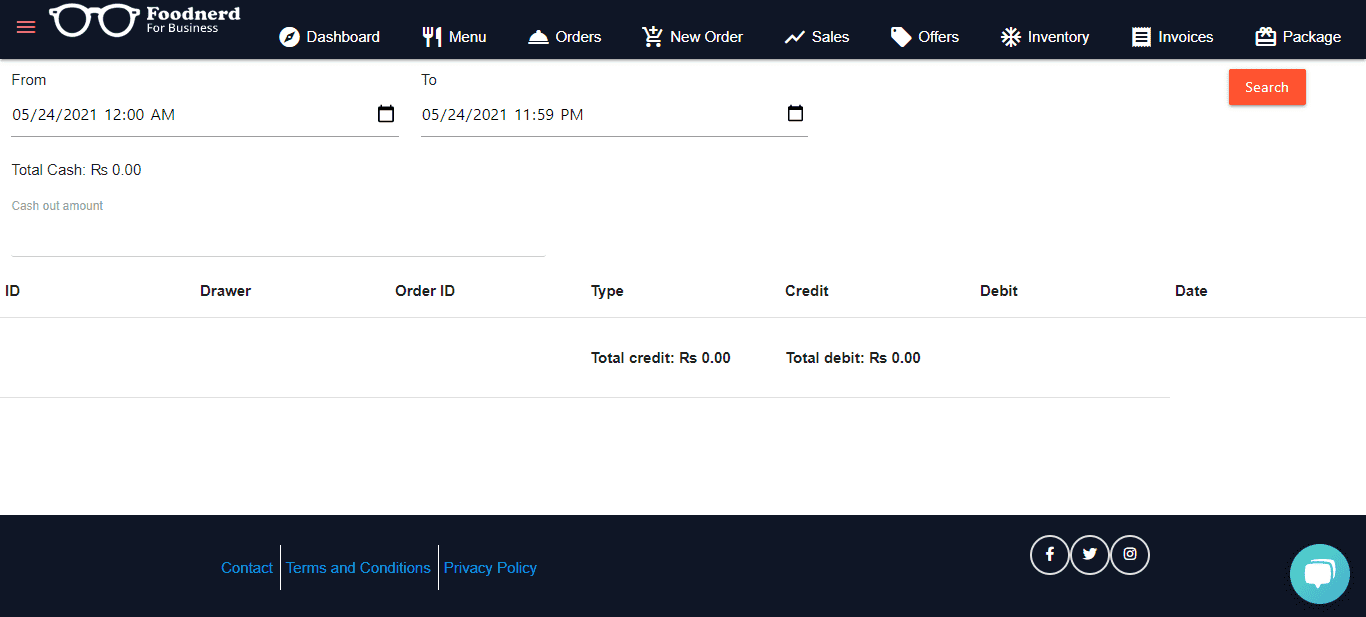
- Click under → the Title section located on the right of the Drawer ID to get the detailed information regarding the cash drawers.

- You will get information that will appear like this as shown below:
Expenses
Purpose of expenses feature
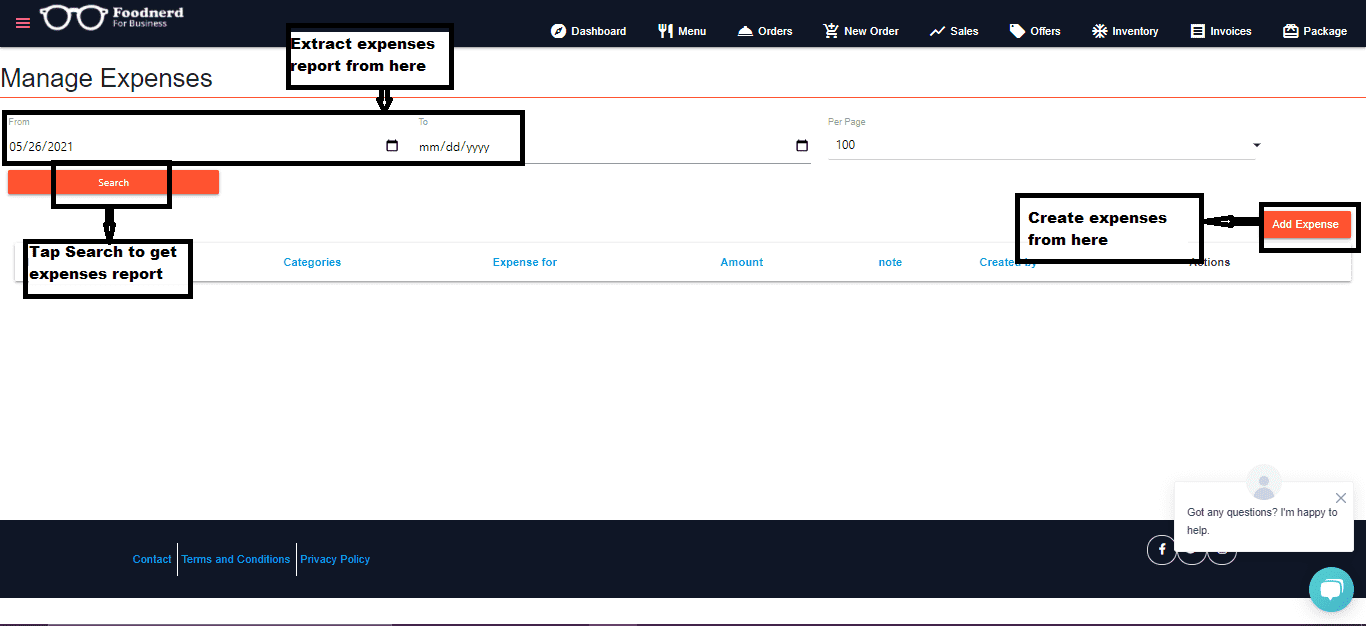
Expenses are basically the cost of operating a company to generate revenue. Users can manage the expanses of the restaurants under this feature
How to manage expenses?
- To change payment methods, Visit→ Expenses located in the side Drawer.
- Add information related to expenses, click→ Add Expense, Fill up the required information and click→ update to save data.
- Users can also get Expenses reports just enter the dates (From- to) and press→ search to get the report.
- Analyze the image to have a broader view of the Manage expenses.
Employees/HRM
Purpose
Under this tab, the user manager or Human resource team can track and analyze reports related to Employees.
How to use this feature?
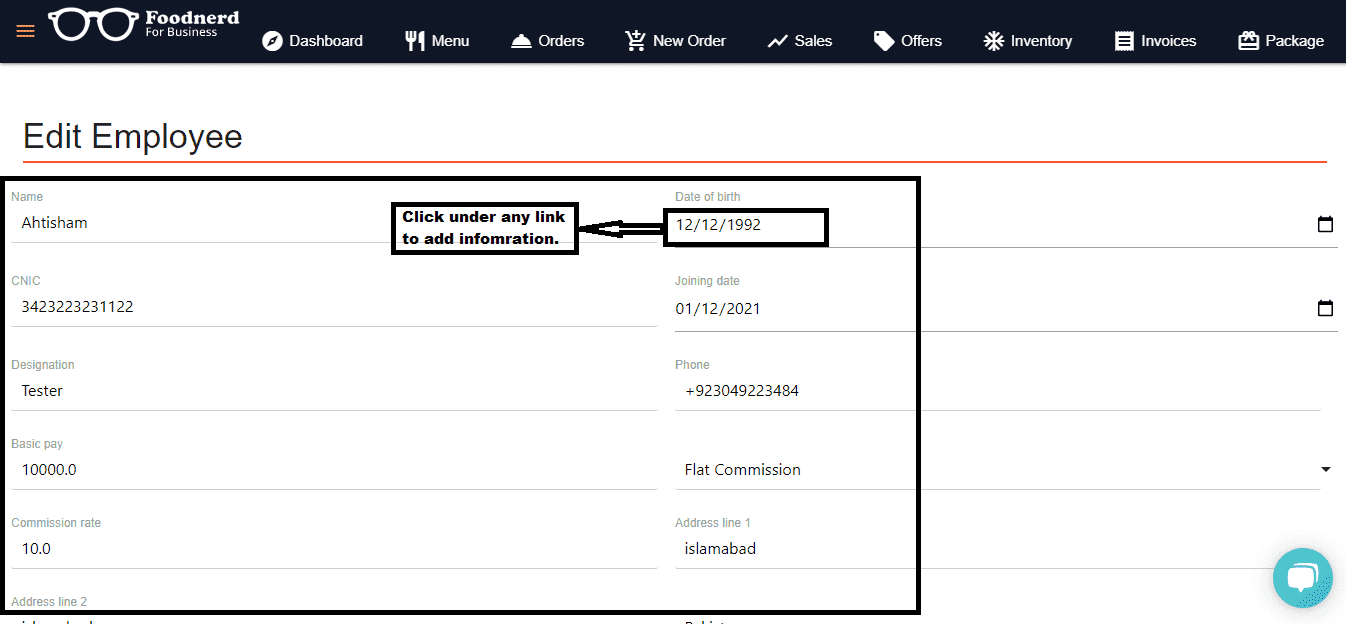
- To add employee Navigate to→ Employees page tap→ New Employee button a form will appear. Fill up all the required fields. Such as Name> DOB> CNIC> Joining Date> Designation> Contact No.> Basic Pay> Employee Commision> Address etc.
- Manage Employee Information hover your mouse under the Action option tap→ Edit or Delete option as per your requirement.
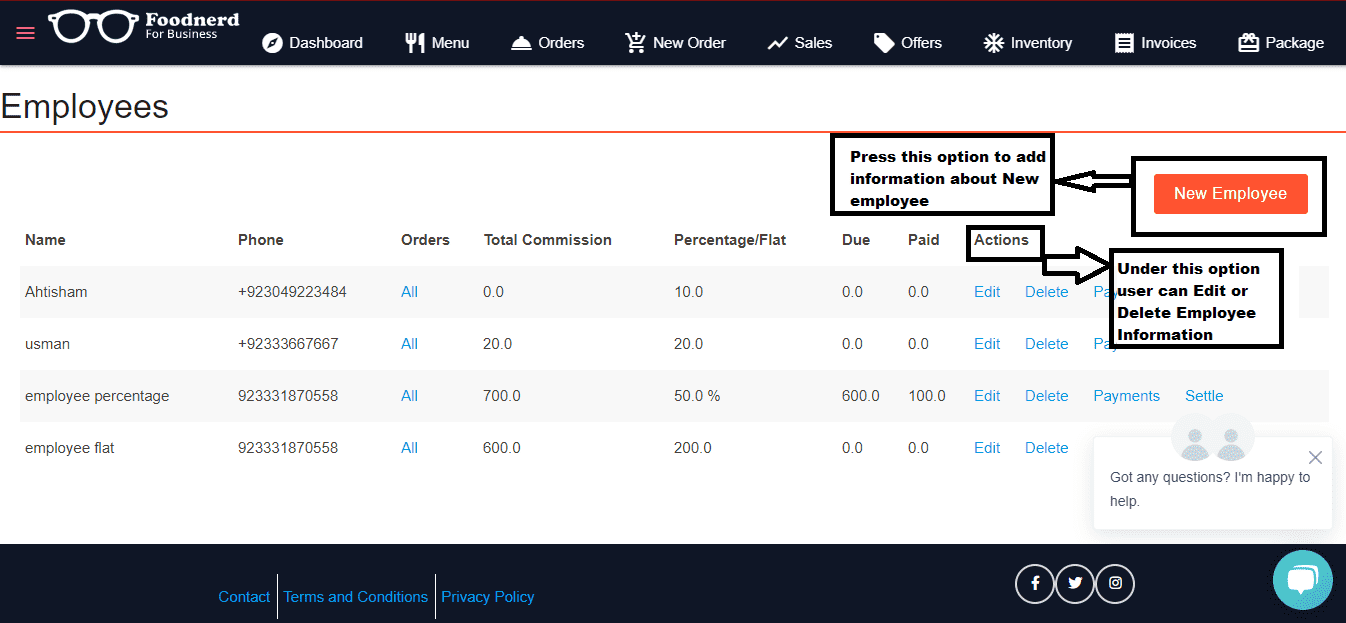
- The information on adding New Employee will appear as shown in the image.
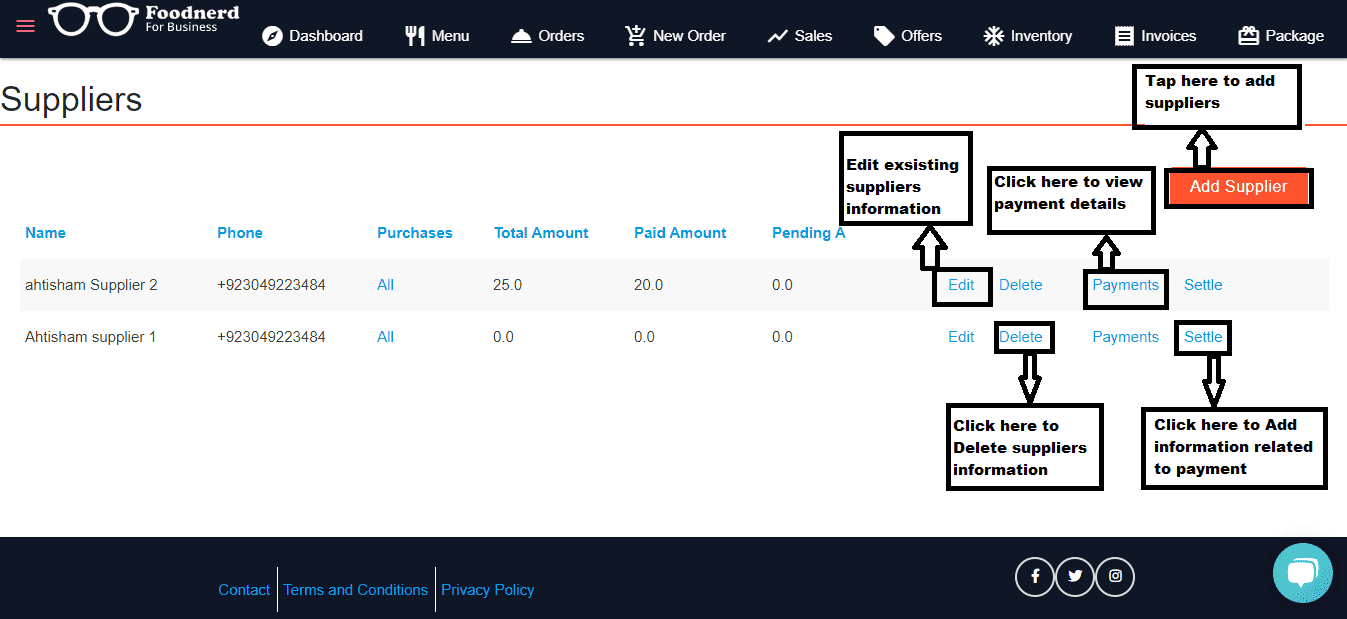
Suppliers
Purpose
The supplier tab allows users to view and manage all the information related to their suppliers.
How to use it?
- Click→ suppliers, and you’ll be redirected to the Supplier page, where you can view respective purchases, pending dues, and much other information.
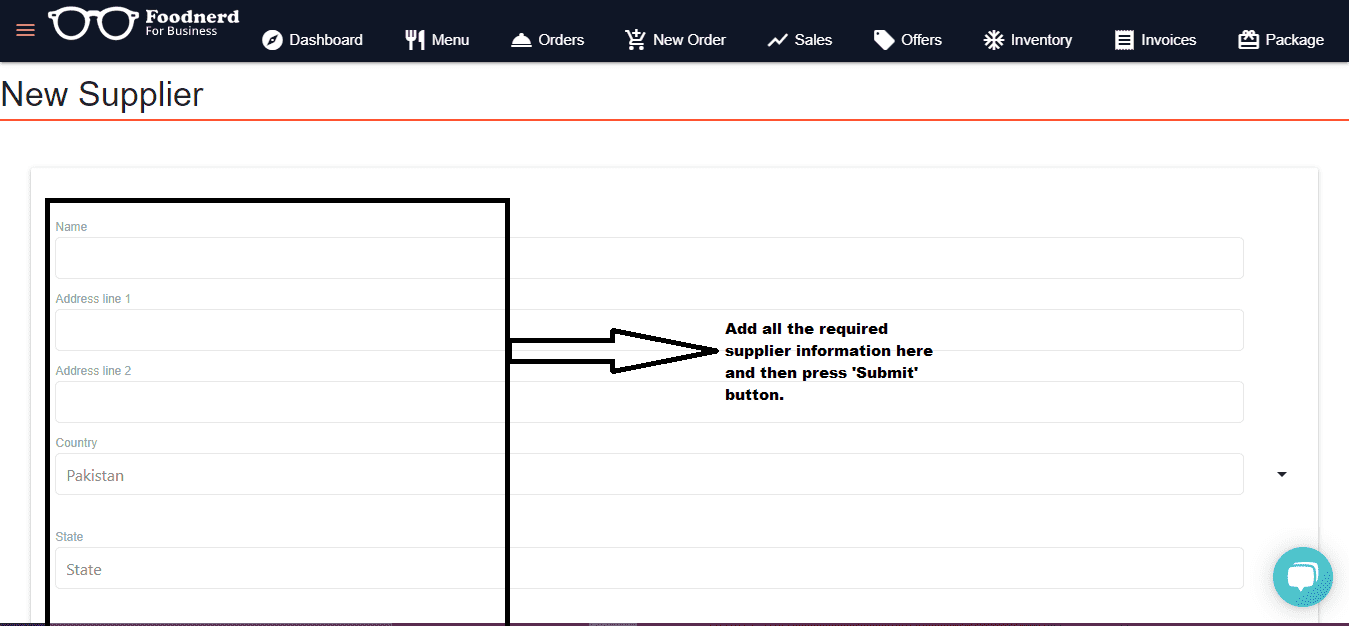
- To Add suppliers, navigate to→ Add Suppliers, → New Suppliers, a form appear where you can add all the relevant information i.e. Name, Address, Country, state etc.
- For detailed insight, see the below image.
- To add suppliers, you need to add some information as shown below:
Reports
- Under the Report section, user can view all different reports as shown below:
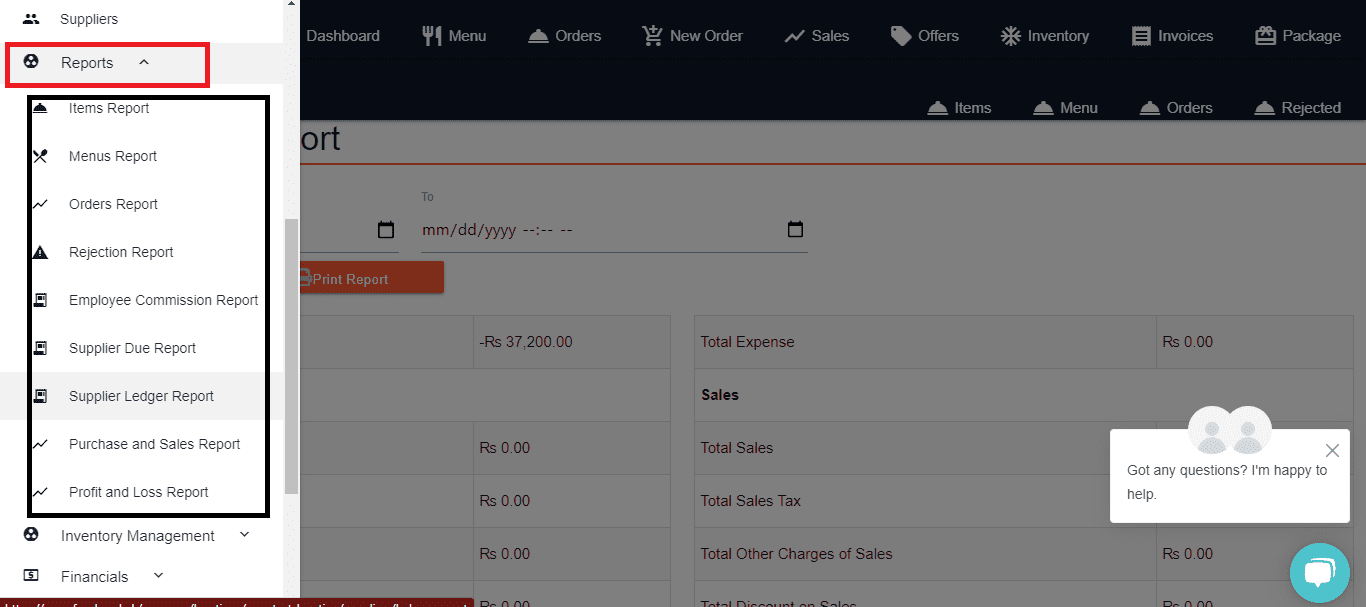
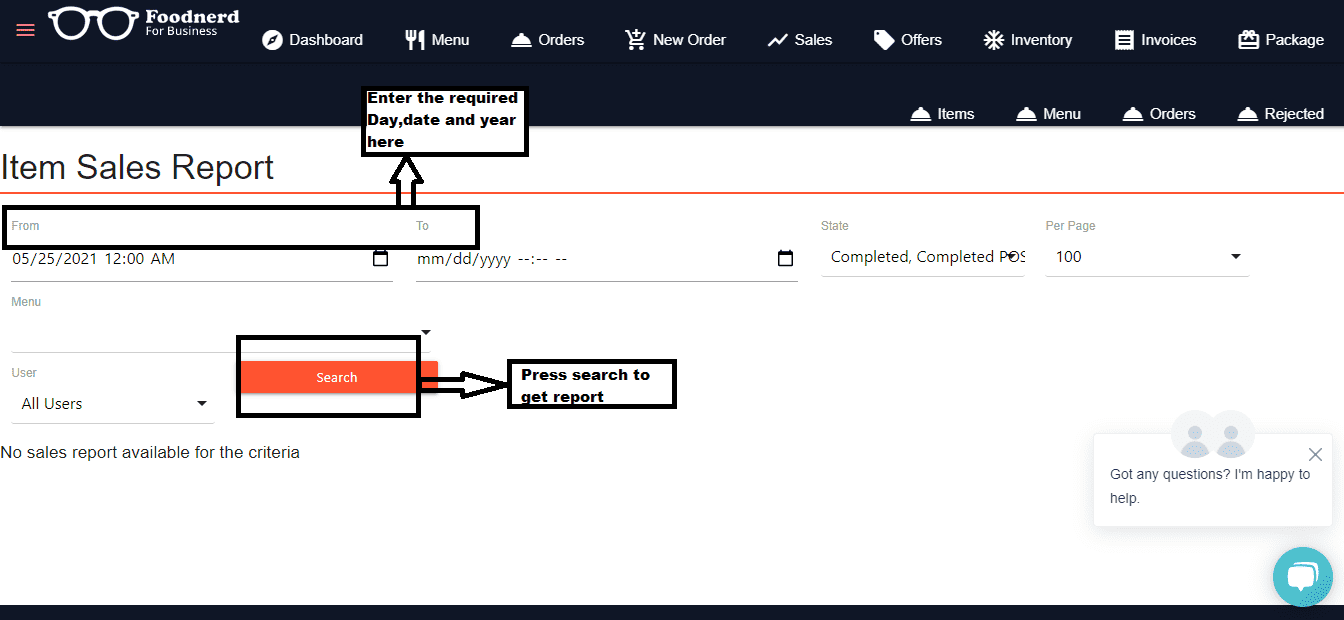
Item Report
- To get ‘Item Report’ Click→ Item report located under the report tab, Enter date, day year (From-to) and Select→ Search and you’ll get details of your sale items.
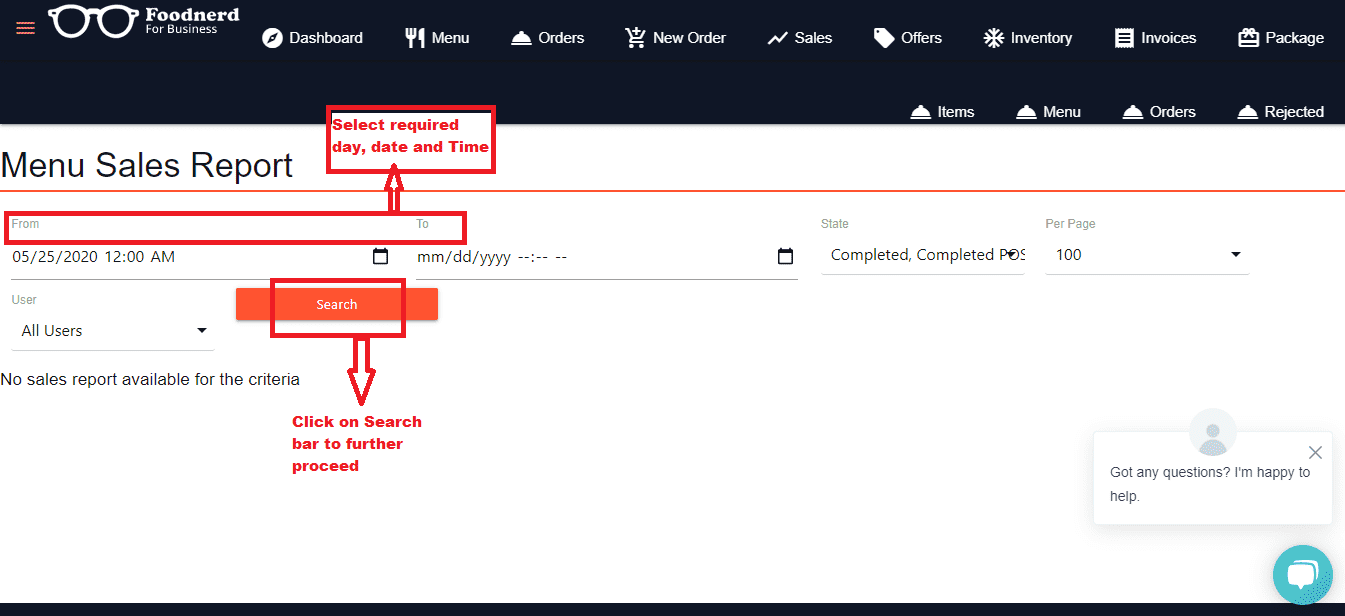
Menu Report
- To get ‘Menu Report’ click on it, and a page of Menu Sales Report fills up the required fields related to date, day and year Tap→ search to further proceed.
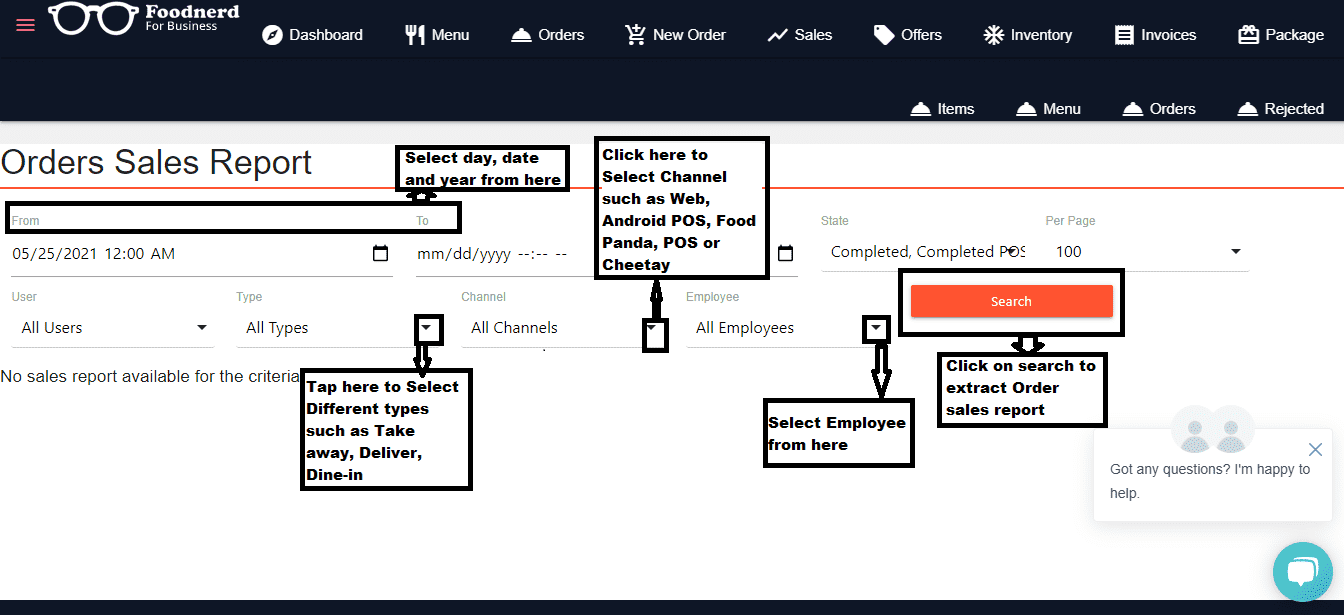
Order Report
- For ‘Order Report’ navigate to Order Sales report page.
- Fill up the required fields such as choose→ date, day and year, select→ type, choose→ channel, Select→ Employee and then tap→ search to extract Order sales report.
- For detailed insight view below image.
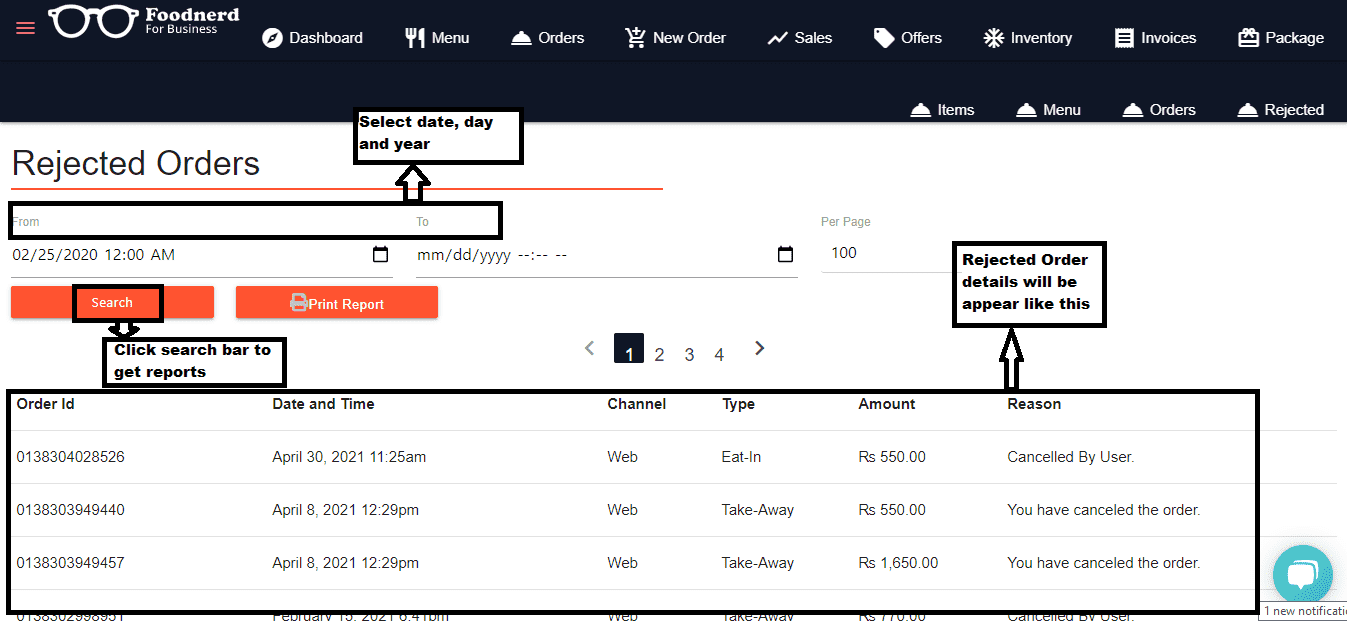
Rejection Report
- To get ‘Rejection Report, hover your mouse to the rejected order page. Select→ date, day, and year, and then Press→ Search bar. The rejected order list with details will appear as shown below:
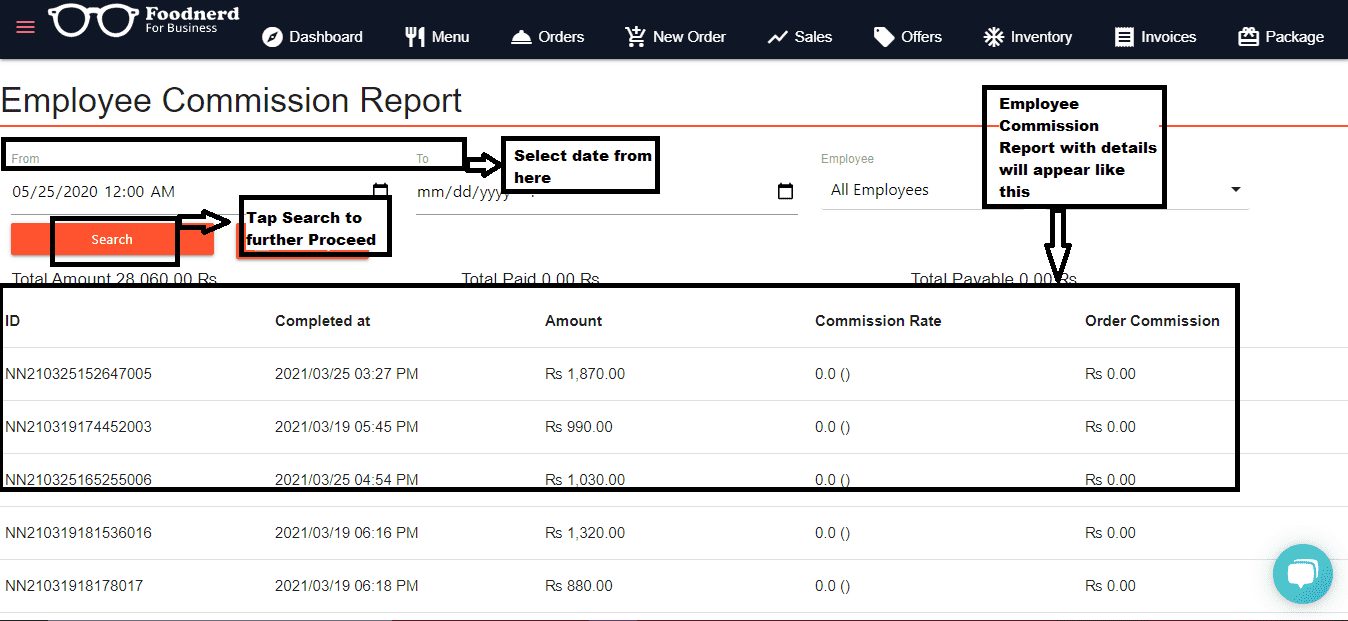
Employee Commission Report
- To get ‘Employee Commission Report’ Navigate to it, and a page will appear as shown below.
- Enter all the required information from-to date and tap→ search to further proceed.
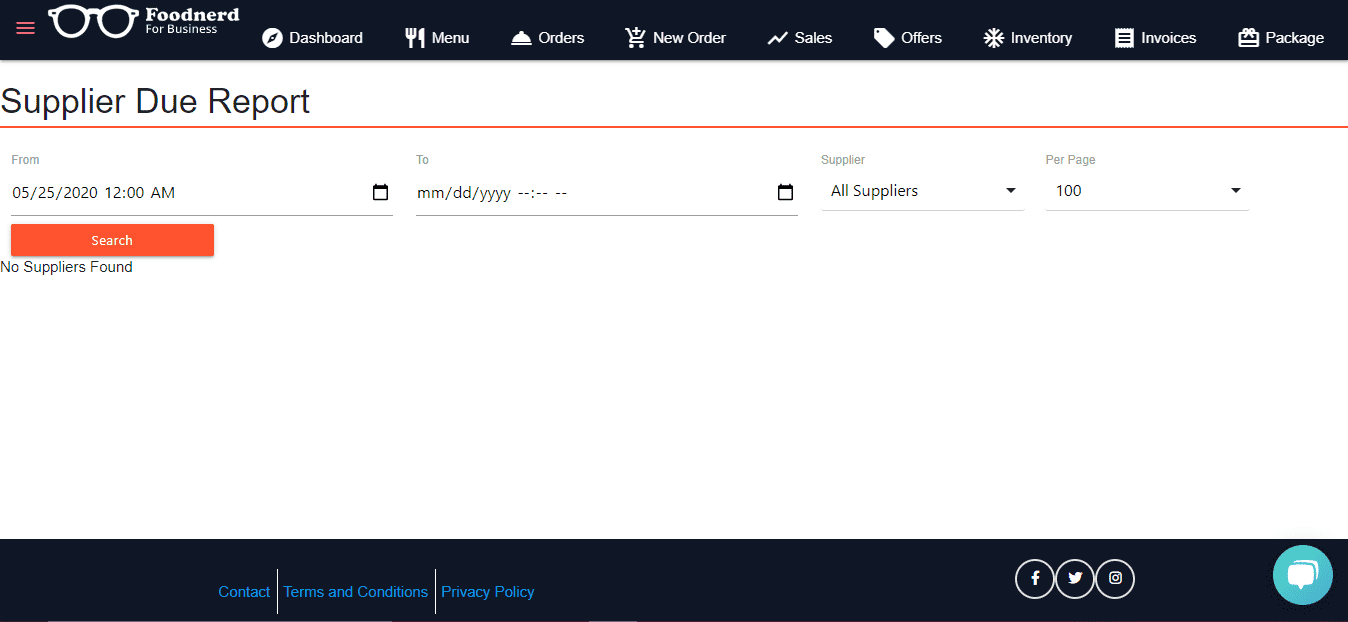
Supplier Due Report
- To get ‘Supplier Due Report’ click on it, and the Supplier Due Report page will appear. Enter→ year day and date (from-to) which you want to extract the report, Tap→ search to further proceed.
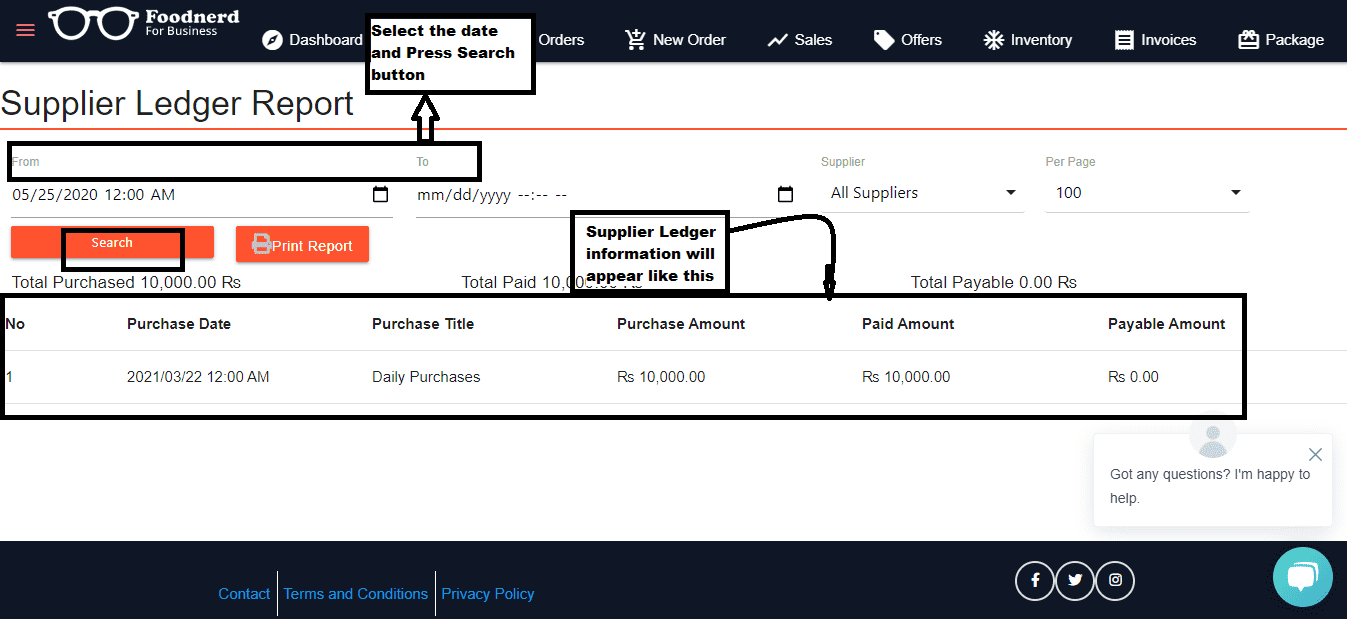
Supplier Ledger Report
- To get ‘the Supplier Ledger Report,’ Navigate to it, Enter→ details and Tap→ Search to continue.
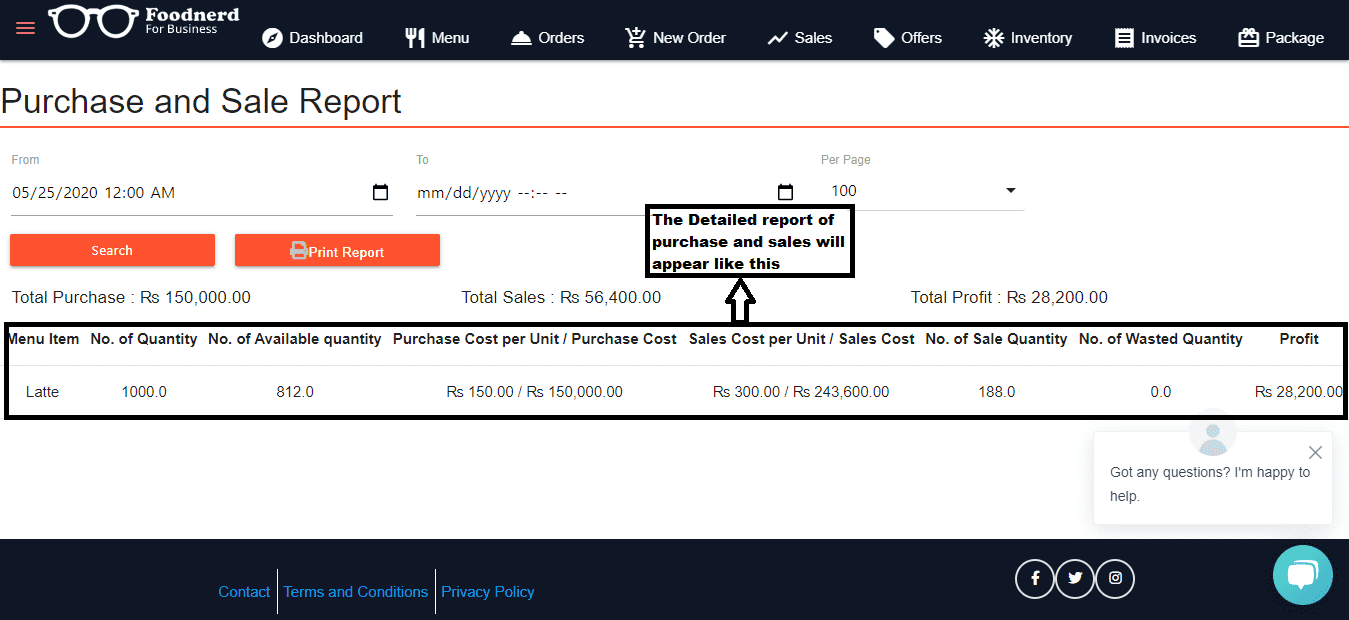
Purchase and Sales Report
- To get ‘Purchase and Sales Report’ click on it, and Purchase and Sale report page will appear
- Enter→ date and tap→ search button.
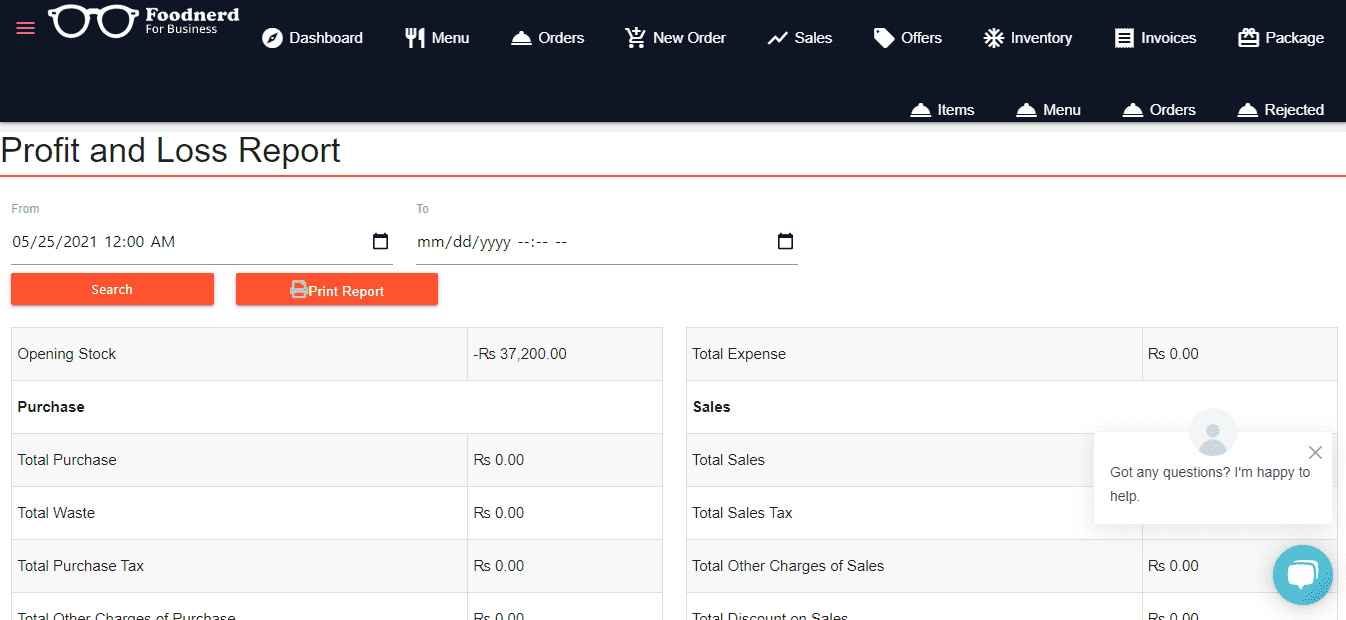
Profit and Loss Report
- With a profit and loss report, users can locate the overall profit and loss on its purchases and sales.
- To get ‘Profit and Loss Report’ click on it, and a page of Profit and Loss will appear where user can view total stock, purchase dues and sales details as shown below:
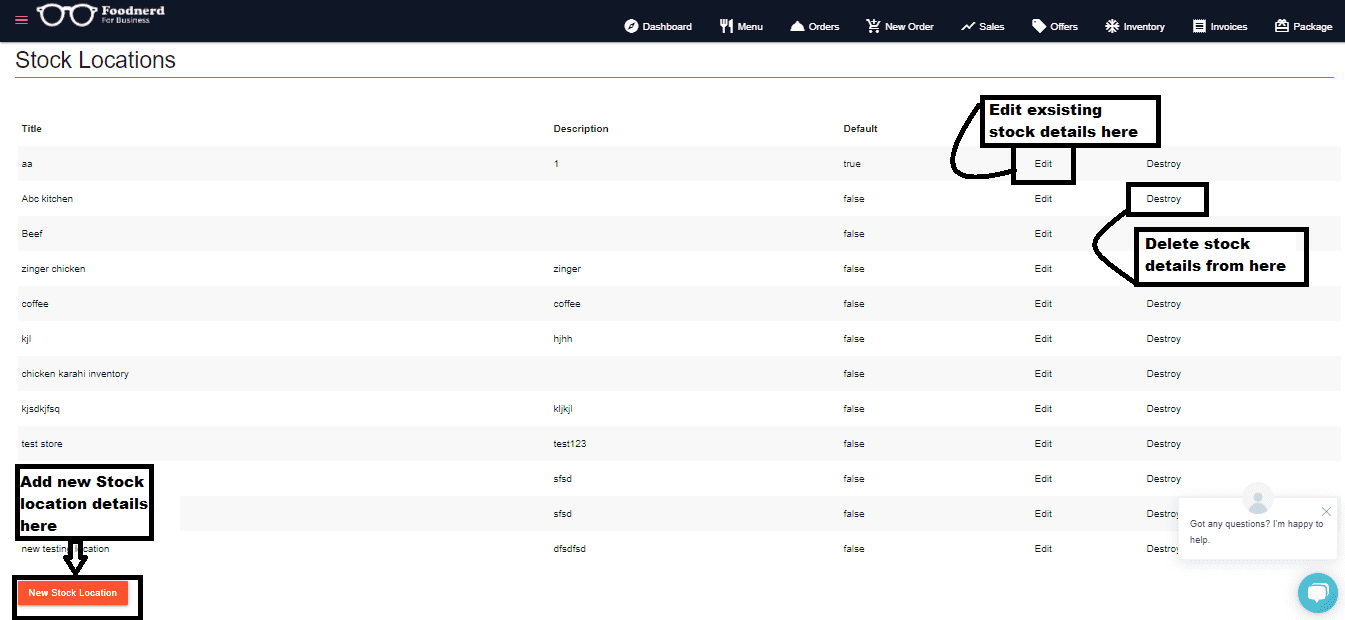
Inventory Management
- To manage your inventory, users need to go to→ ‘stock location’ under inventory management.
- Inside the Stock location page users can view all the available stock, in order to Edit existing stock tap→ Edit Stock and enter the required details. Users can also delete stock, just click→ delete and then confirm.
- Users can also add new stock location details. In the left last corner click on→ Add Stock location, fill up required details and then click→ update.
- See the below image to understand all the functionality.
Financials
Purpose
Under the financial tab, the user can view its invoices and different packages
How to use it?
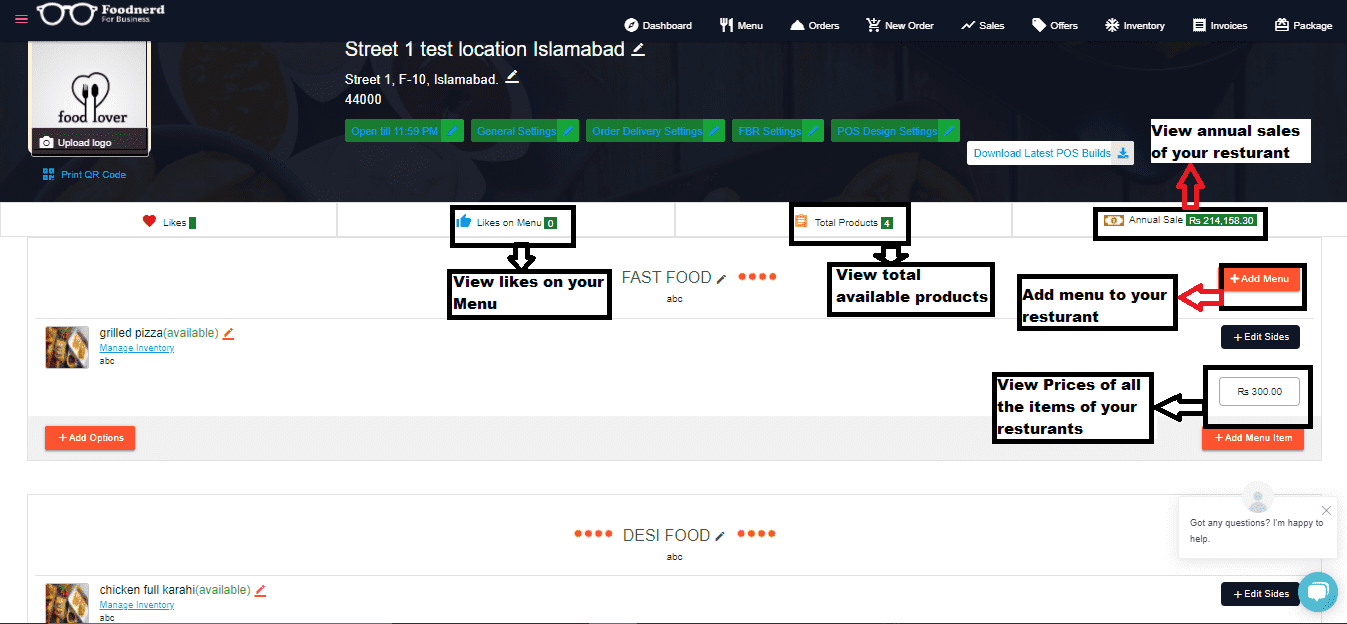
- Click→ Invoices option a page will appear where the user can add a menu and view the restaurant’s annual sale, Total products, etc. as shown in the image below:
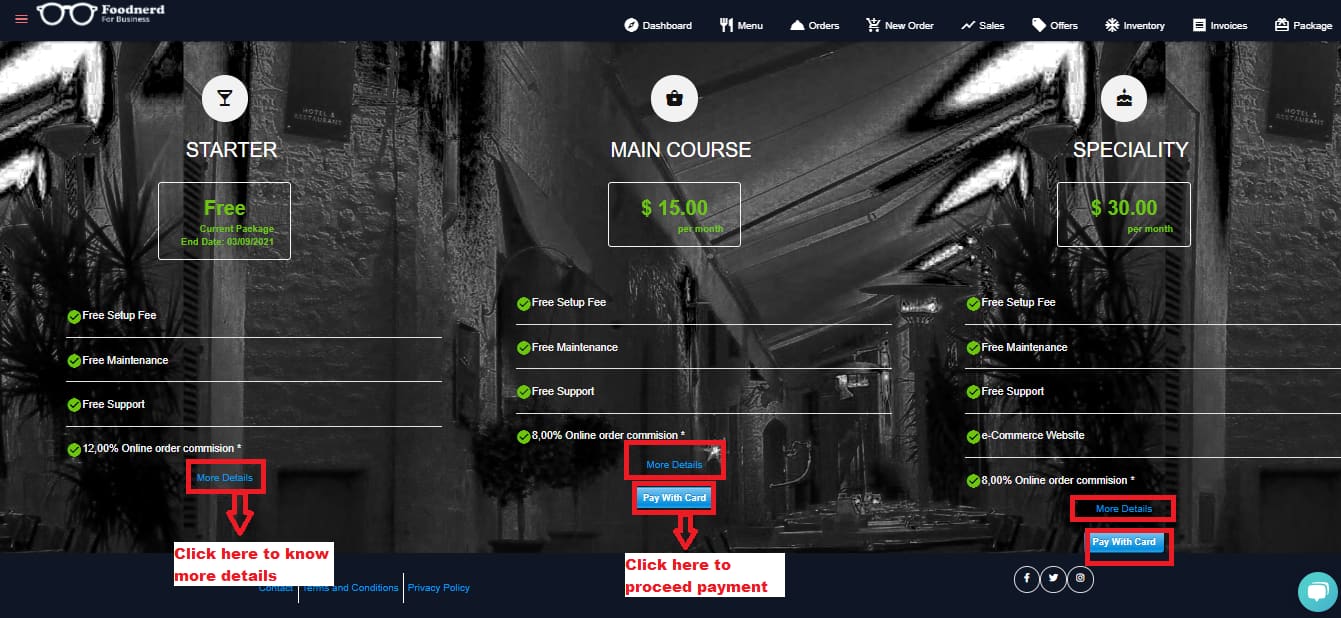
- To view, the packages click→ Package under the Financial link. A page will appear as shown below.
- There are three different packages i.e. Starter, Main course, and Speciality.
- To view details related to the package click→ more details.
- To confirm any package click→ pay with card.
- Select the package that matches your restaurant requirements
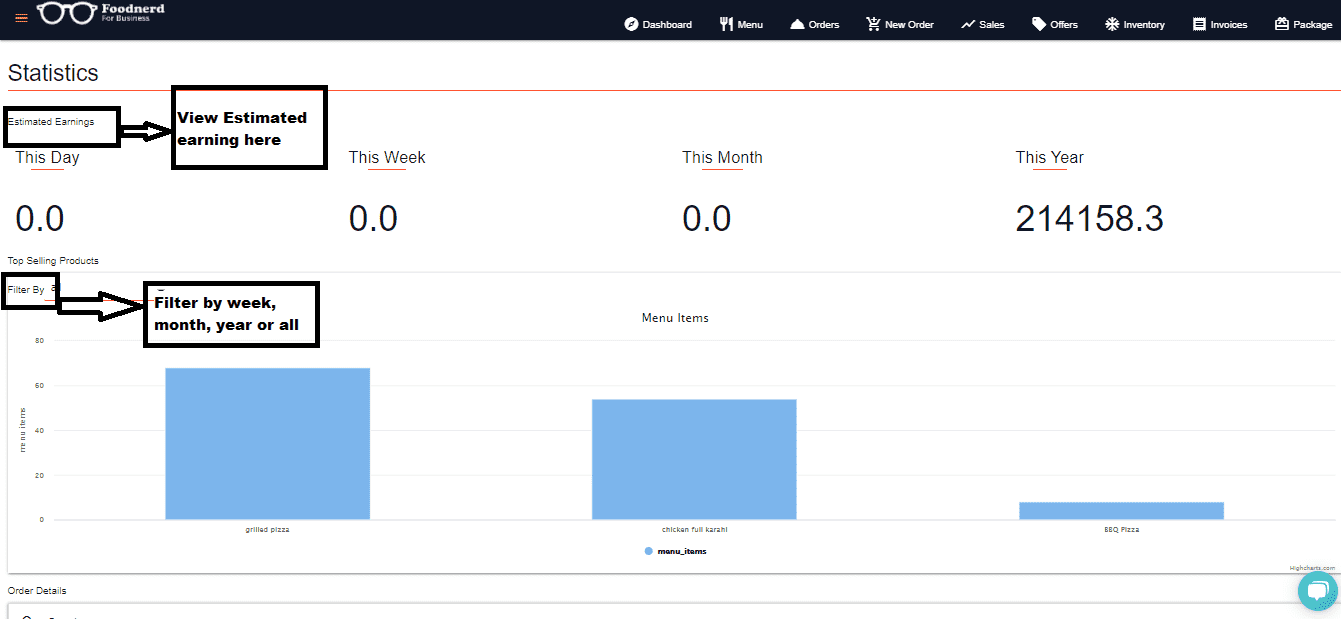
Location Statistics
- Users can view its restaurant location statistics such as estimated earnings within a day, week, month and year.
- You can also have the option to filter to get specific details of selective day, year, or month.
Marketing/Offers
- Under Marketing/Offers, users can avail three different features as highlighted below.
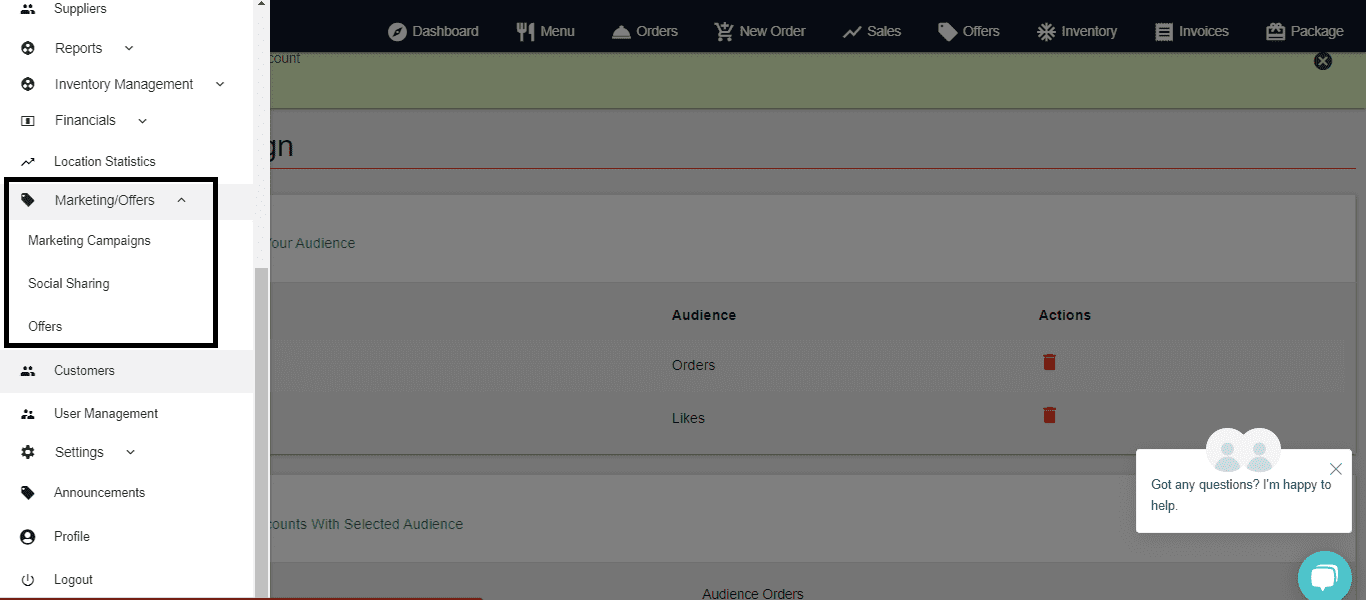
Marketing Campaigns
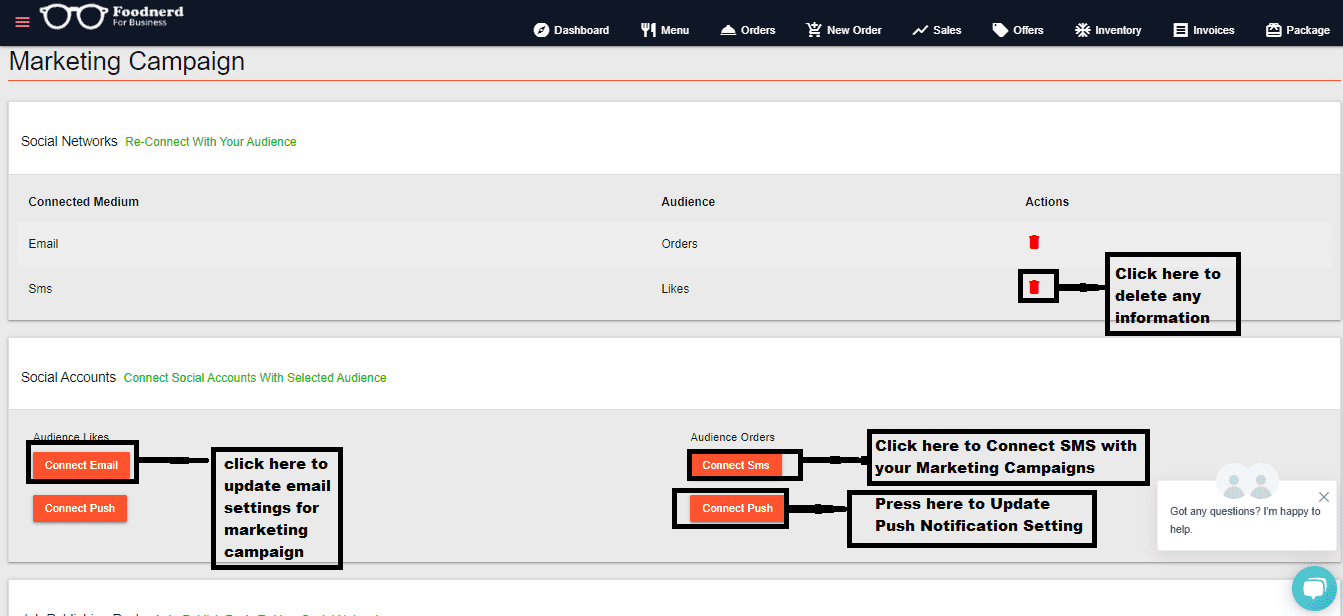
- To manage marketing campaigns, click→ ‘Marketing Campaigns’ option; a page will appear.
- To connect your marketing campaign with Email, SMS or push click on the buttons to enable it.
- To delete any information Press→ bin icon and then tap→ confirm.
- Manage settings as highlighted below
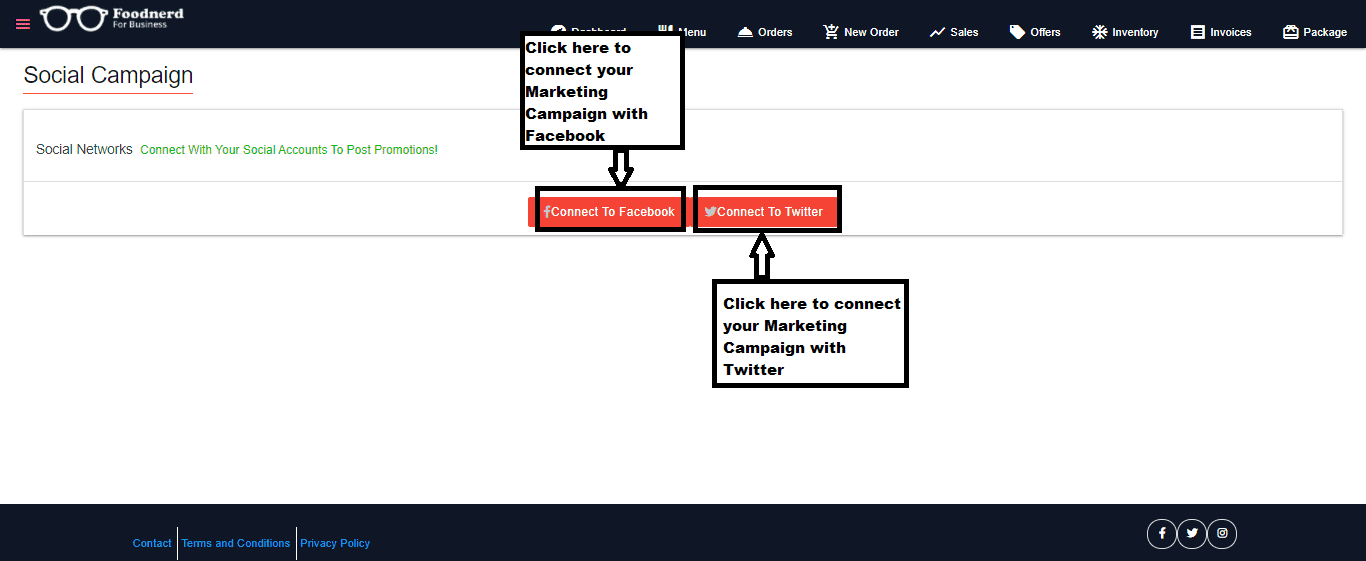
Social sharing
- To share your marketing campaigns on a Social platform, click→ Social sharing Under Marketing/Offers option, two buttons will appear i.e. Connect to facebook and twitter.
- To share your marketing offers on Facebook click→ Connect to facebook.
- To share your marketing offers on Twitter click→ Connect to Twitter.
- Thoroughly observed below image to have a broader view.
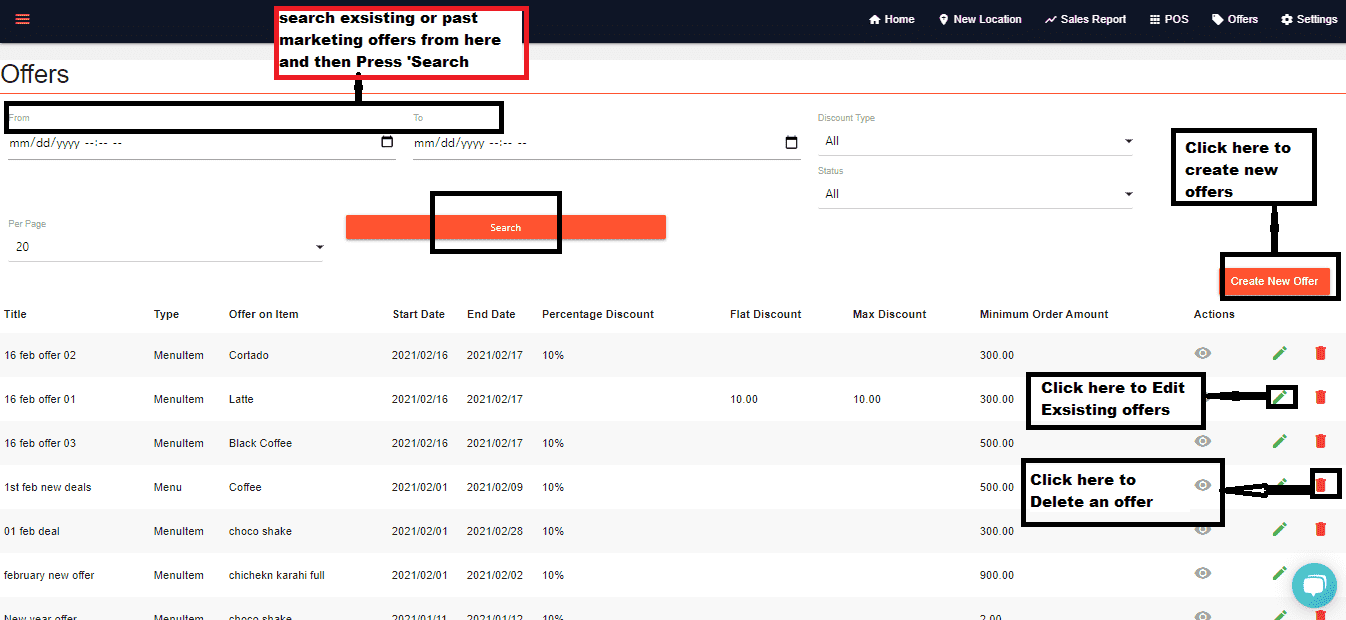
Offers
- To create new offers for marketing. Go to the →'Offers’ option under Marketing/Offers and the offer overview page will appear. Click→ Create a new offer and fill out all the required information.
- Click→ edit icon to edit existing offer details while, tap→ delete icon to delete any information.
- Thoroughly analyze the below image for further guidelines.
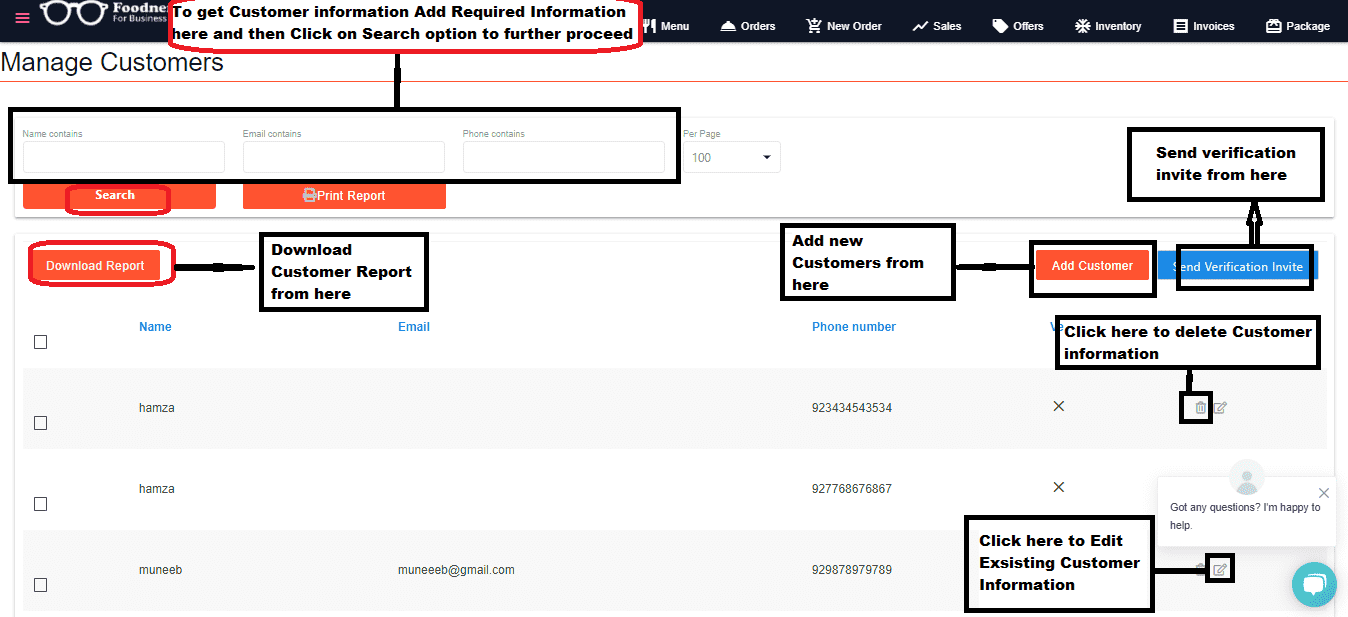
Customers
- Customer tab inside the side drawer allows you to analyze, manage, monitor and visualize customer data for your restaurant.
- To Manage Customers Click→Customers tab, and the ‘Manage Customer’ page will appear.
- In order to get customer information enter the required details like date, day and year and click→ search to get a report, click→ print report to get the customer report printed in hard copy.
- To Add any new customer Tap→ Add Customer, fill up all the required details and Save information.
- To Edit or Delete information click on the icons and manage accordingly.
- Click→ Verification invite to send it to the customer.
- Conduct settings accordingly, as highlighted in the image below:
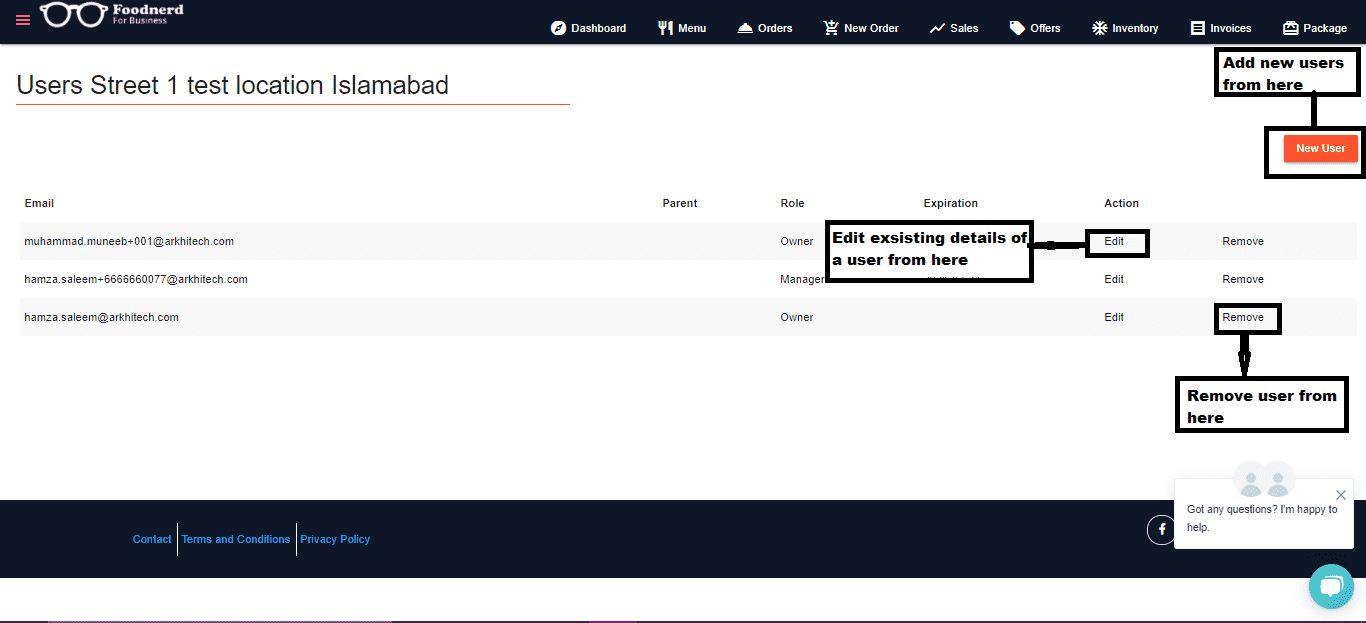
User Management
- To manage the users click→ User Management option and you’ll be redirected to it where you’ll locate various options.
- To Add any user tap→ New User, fill up required information to further proceed.
- To Add any user tap→ New User, fill up required information to further proceed.
Settings
- Thoroughly analyze below image:
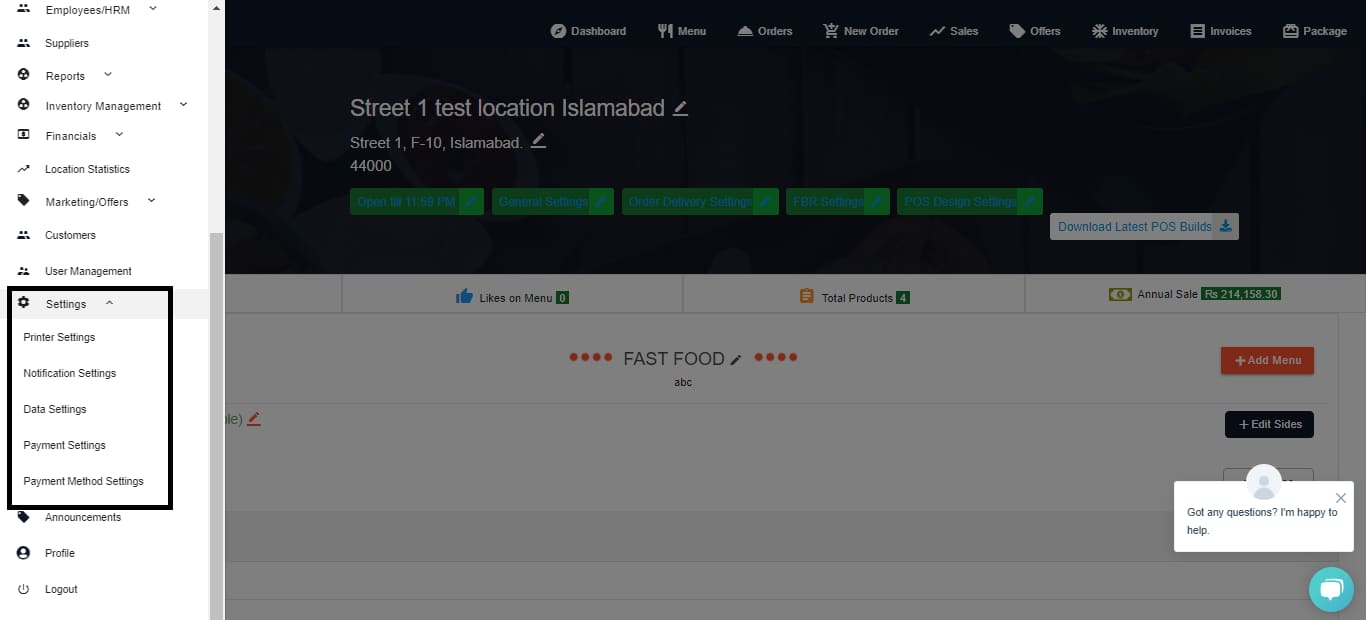
Inside settings, there are different options available as shown below:
- Printer Settings

To manage Printer settings, Go to → ‘Printer Settings’ option under Settings. A page will appear as shown below; conduct changes accordingly.
- Notification settings
- In the notification panel you’ll receive alerts regarding your subscriptions that allow you to take actions on proper time. You also have an option to dismiss notification alerts any time.
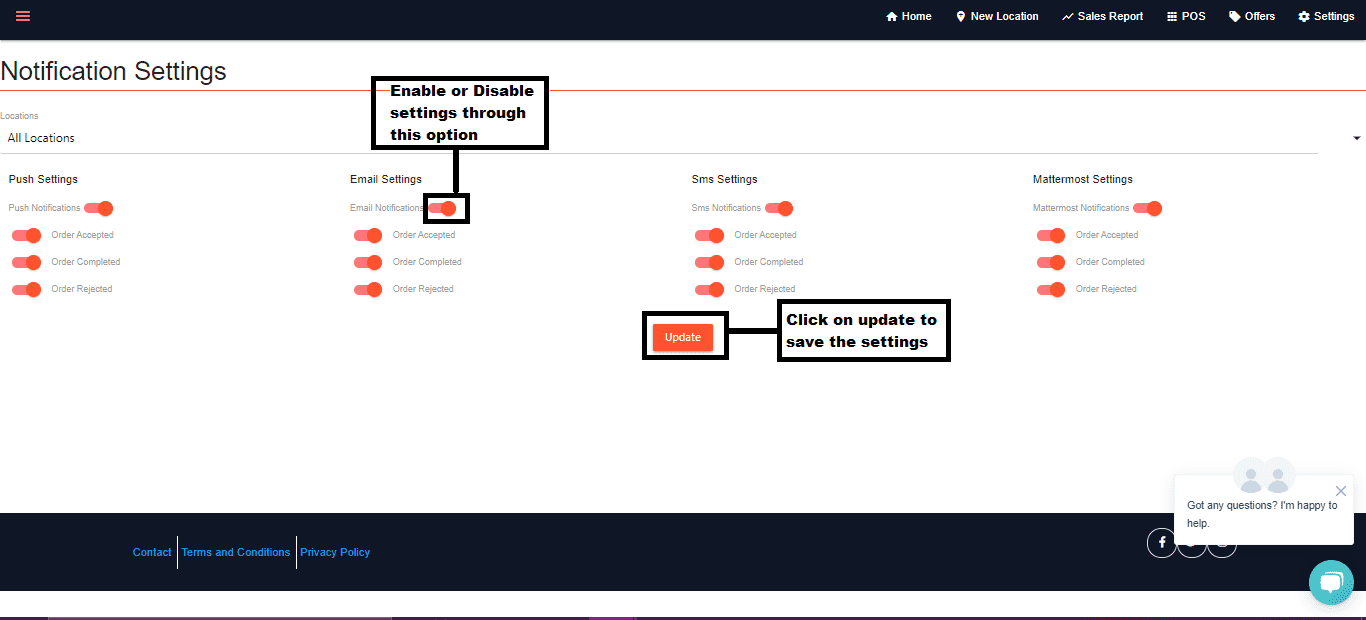
To enable notifications of email, mattermost, SMS and push notifications, just press → Enable/Disable settings button located under these settings and Click→ Update to save the settings.
- Data Setting
- To manage the Data setting, go to→ Data Settings. Where you will view different buttons that appear in front of every option. Enable/Disable settings accordingly.
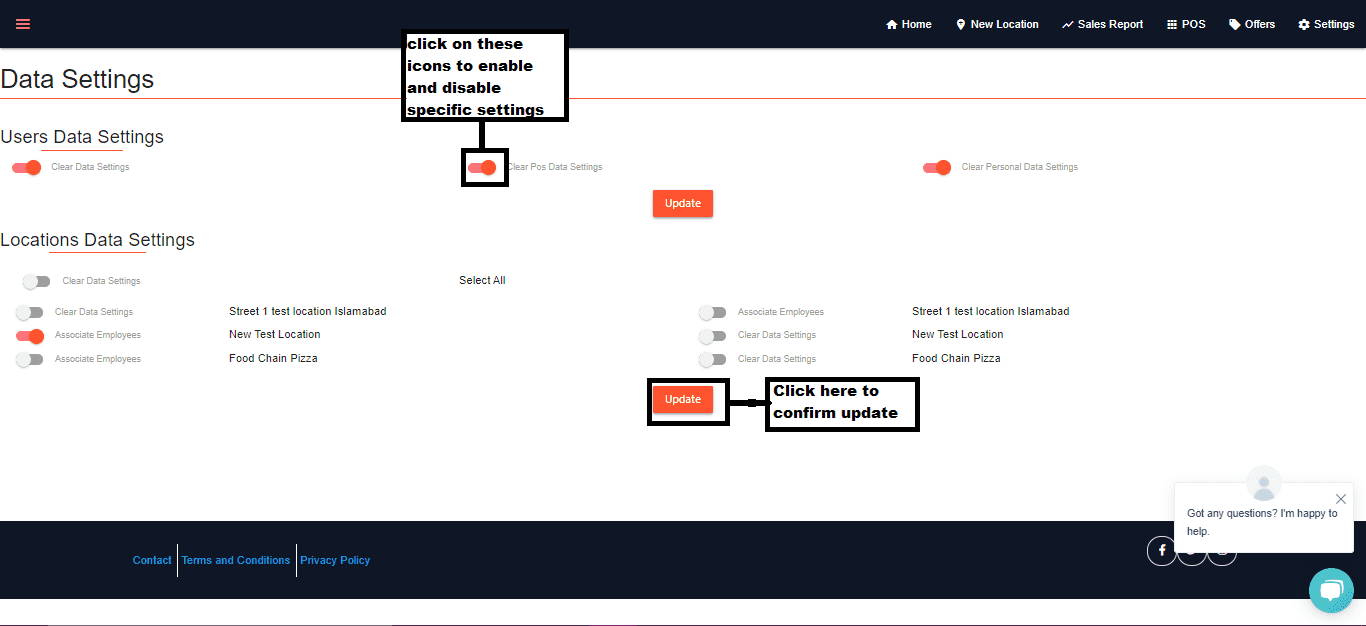
Click on it and view the below image for further details.
- Payment Settings
- To update payment settings, navigate to → Payment Settings Tab, and you’ll reach the payment settings page as shown below.
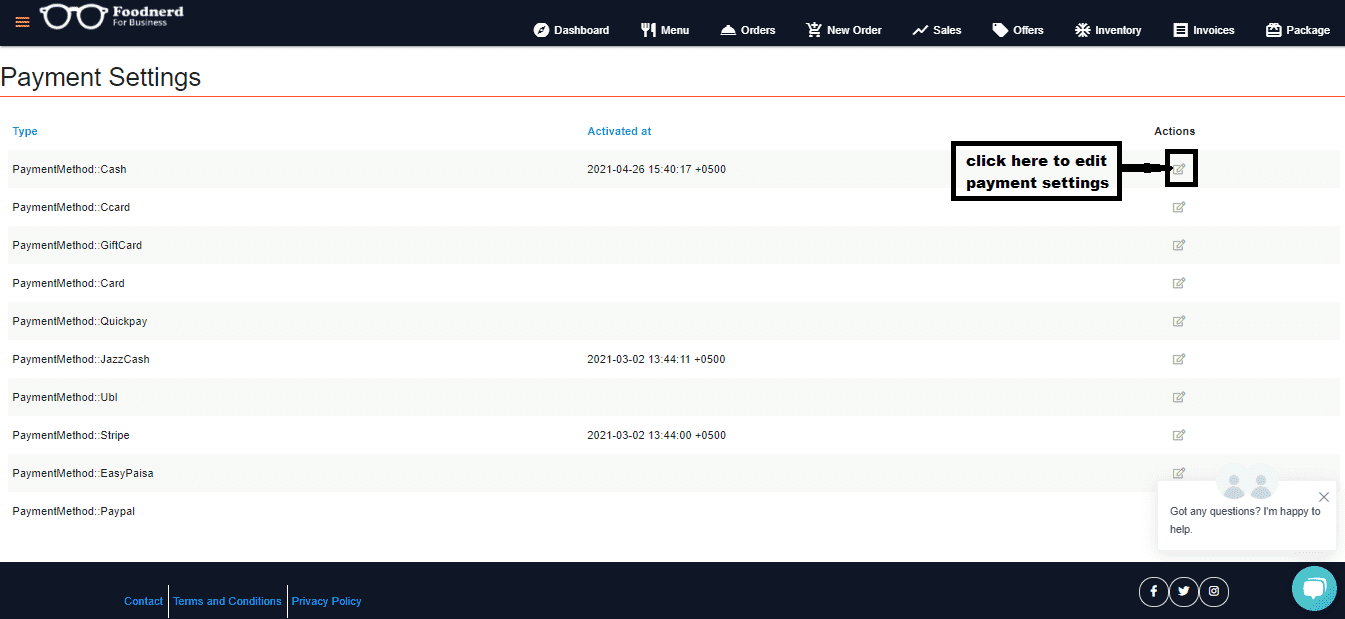
Press → the Edit icon to update or delete information.
- Payment Method Settings
- To change the payment method, Visit → Payment Method Settings, and you’ll be redirected to it. Then click → Add Payment Method to include all the payment details.
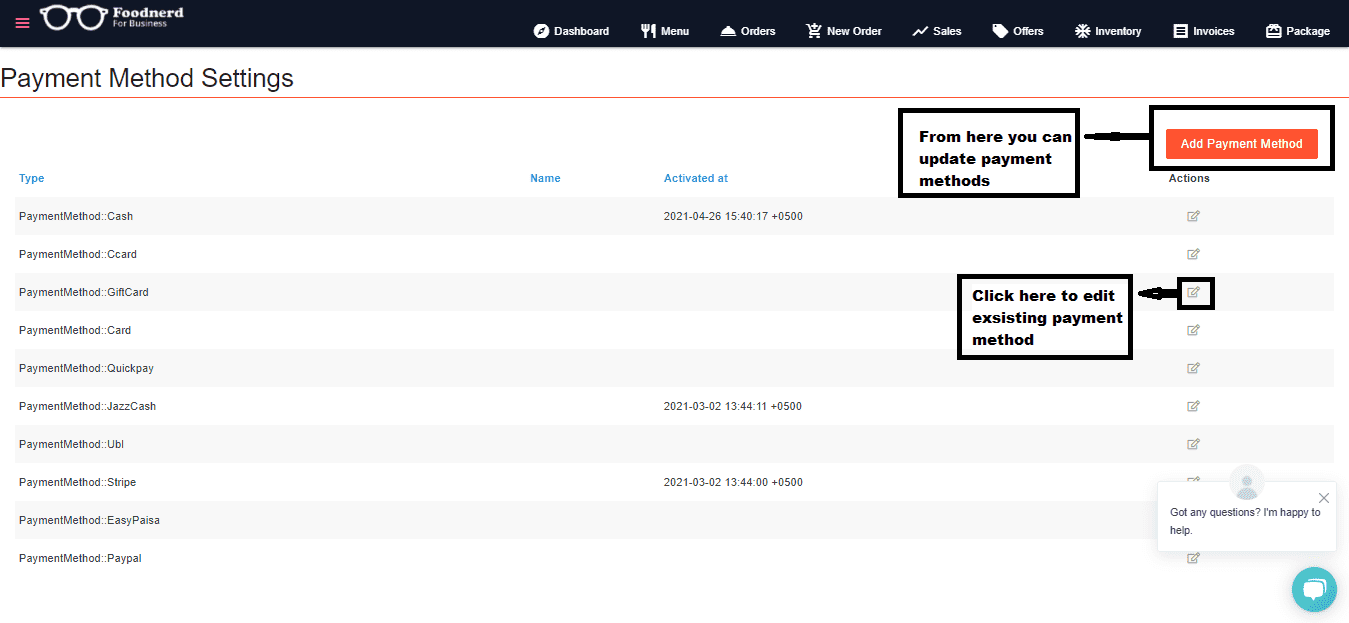
Announcements
Press→ the Bin icon to delete existing payment information. Thoroughly analyze the below image to have a quick view.
- With the announcement tab users can view, create, delete or edit an announcement as shown in the image below.
- Click→ the Announcement tab to reach the Announcement overview page, then click → Add Announcement button to add any new announcement.
- Click→ the Edit icon to Edit an existing announcement.
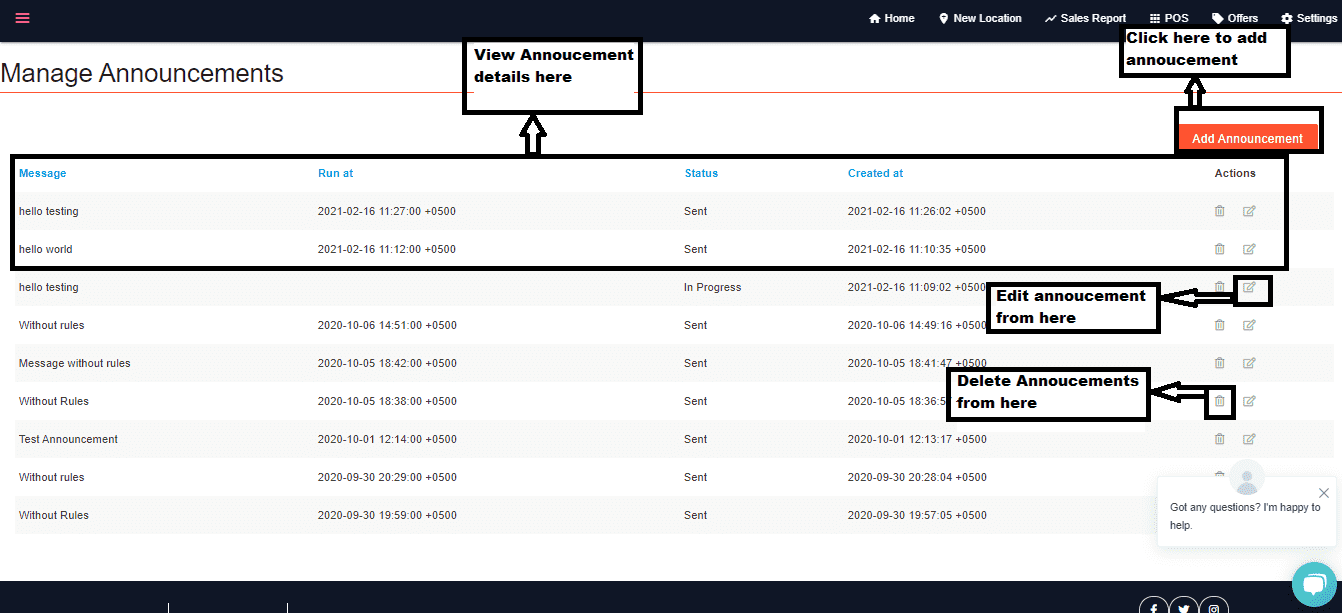
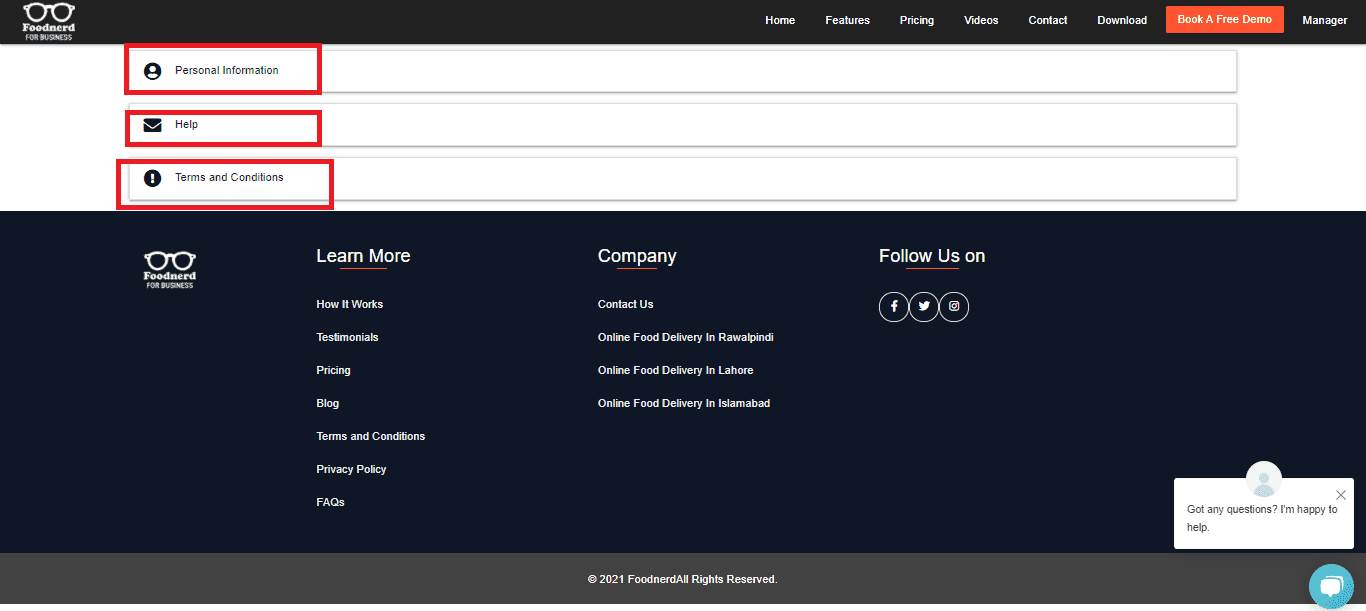
Profile
- Press→ the Delete icon to delete any announcement.
- The Profile link allows users to Update→ Personal details, Get → Help, and View→the Terms and Conditions of Foodnerd, as highlighted in the image below.
- To add personal information, Click → Personal Details and enter all the required information.
- To get any help, Click → Help. An Email Us option will appear. Click on it and Email all your queries. Foodnerd customer support representative will respond to you as soon as possible.
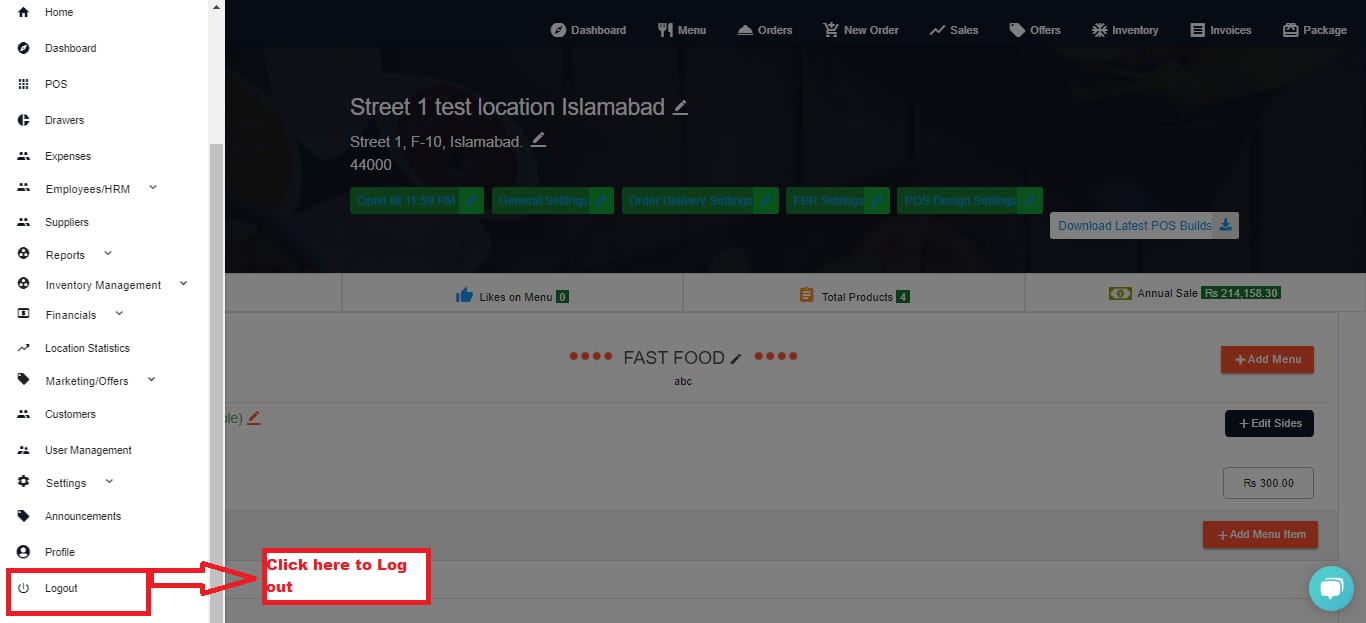
Logout
- To log out to foodnerd Point of Sale system, Click→ the Logout option as shown in the image below and safely log out your credentials.
Do You Have Any Question For Us?
We are just a phone call away. Have live chats with our technical support team and address your queries right away.
Contact Support
 Facebook
 Twitter
 Instagram